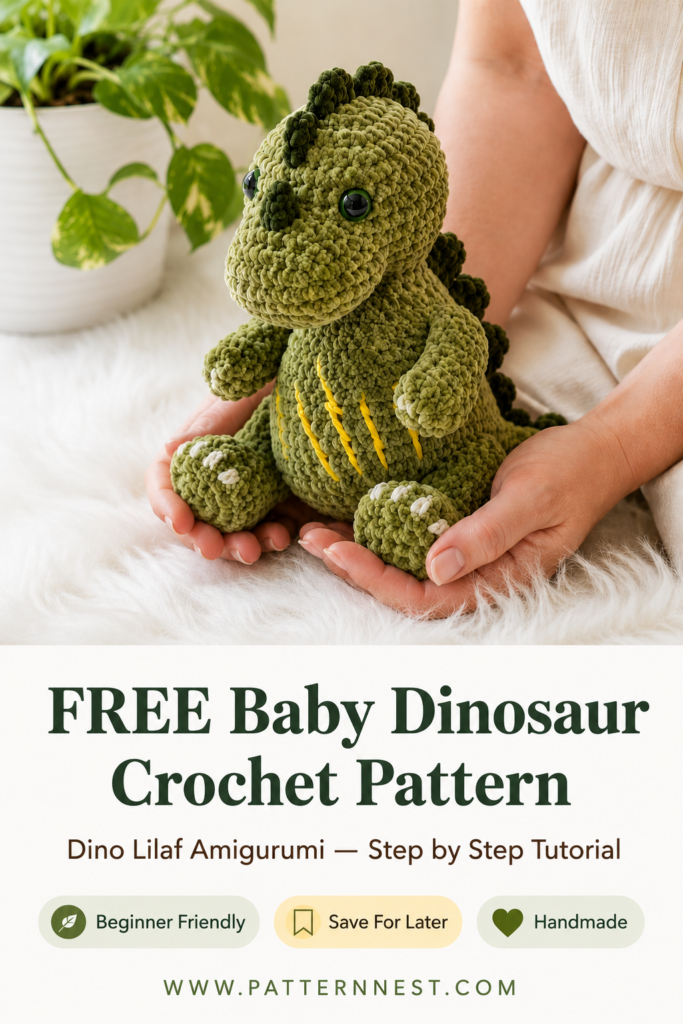
Free Baby Dinosaur Crochet Pattern: The Cutest Dino Lilaf Amigurumi Toy You Will Ever Make
Introduction
If you have been searching for a crochet toy that is soft, squishy, absolutely adorable, and completely beginner-friendly, you just found your next favorite project. This free Dino Lilaf Amigurumi pattern walks you through crocheting a huggable baby dinosaur toy from start to finish — no prior amigurumi experience required.
This pattern is perfect for mothers who want to make a one-of-a-kind handmade gift, crafters who love cute plush toys, and anyone who wants to learn amigurumi with a satisfying and practical project.
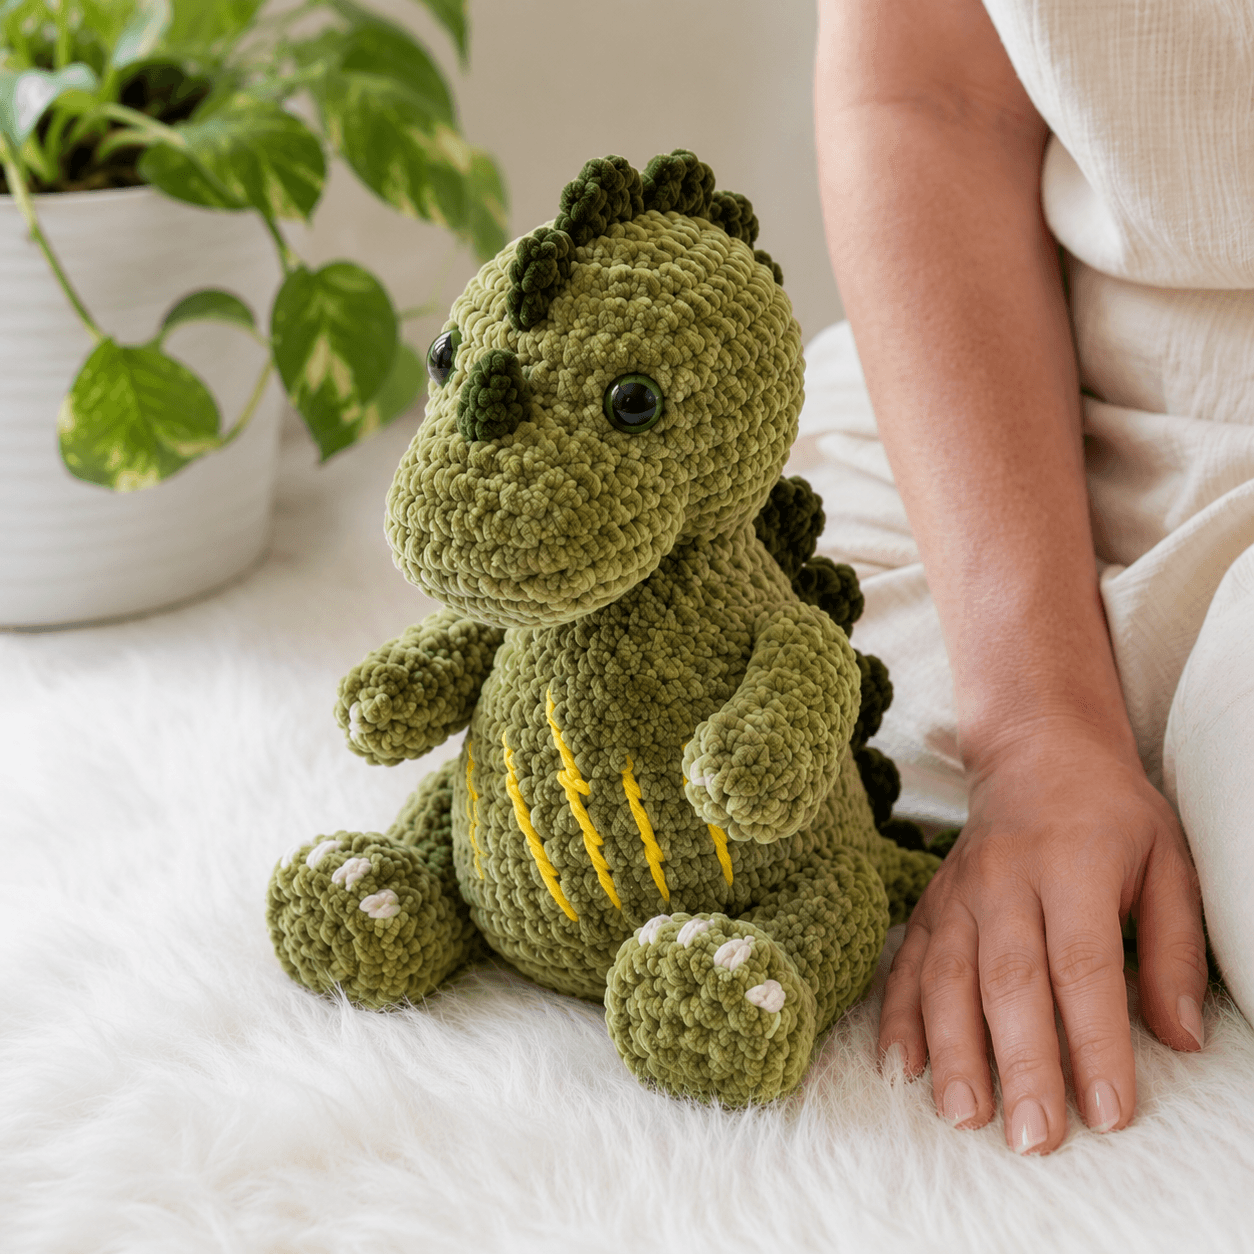
You will be working with soft olive sage green velvet chenille yarn — the same gorgeous muted green tone you see in the finished photos — paired with a contrasting dark forest green horn, white claw embroidery, and playful yellow belly stitching. The result is a 10–11 inch stuffed dinosaur that looks like it came straight from a boutique toy shop.
Whether you are making this for a baby shower gift, a toddler’s birthday, or simply because dinosaurs are irresistible, this project will become one of your most-reached-for patterns.
Frequently Asked Questions
Is this pattern beginner friendly? Yes, absolutely. While this is technically labeled beginner-intermediate, the stitches used are very basic — primarily single crochet and magic rings. The most challenging parts are assembling the pieces and adding the embroidery details, but step-by-step instructions and photos make both very manageable. If you have completed a basic granny square or a simple dishcloth, you are ready for this pattern.
What yarn works best for this dinosaur amigurumi? Velvet chenille yarn is strongly recommended for this project because it creates that signature soft, plushy texture that makes the finished dinosaur look like a luxury stuffed animal. Bernat Blanket Extra in a sage or olive green tone is an excellent choice. Lion Brand Velvet yarn is another great option. Avoid regular acrylic or cotton for this specific project — the velvet texture is what gives the Dino Lilaf its irresistible huggable appearance.
How long does this crochet dinosaur take to complete? Most crocheters finish this project in one or two sessions totaling 4–6 hours. Experienced amigurumi makers may finish closer to 3–4 hours. The body and head are the most time-consuming pieces. The limbs, ears, and horn work up very quickly once you have the main body done.
What size will the finished dinosaur be? The finished Dino Lilaf measures approximately 10–11 inches tall when fully stuffed and assembled. This is a perfect lap-sized stuffed toy, large enough to be a great cuddle companion but small enough to carry in a diaper bag or tote.
Can I use different colors? Definitely. This pattern works beautifully in any single chenille color — dusty rose, lavender, cream, warm gray, or even a bold teal would all look stunning. Just keep the horn a slightly darker or contrasting shade of your main color, and use a bright accent thread for the belly embroidery to maintain that charming detail. The consistency of the yarn type matters more than the color choice — just stay with velvet chenille for the best result.

Materials Needed
Here is everything you need to crochet the Dino Lilaf Baby Dinosaur Amigurumi:
Yarn:
- Velvet chenille yarn in Olive Sage Green — approximately 200–250 yards (main color for body, head, limbs, ears)
- Velvet chenille yarn in Dark Forest Green — approximately 15–20 yards (horn/crest)
- Embroidery floss or thin yarn in Bright Yellow — small amount for belly claw embroidery
- Embroidery floss or thin yarn in Off-White/Cream — small amount for toe claw markings
Velvet chenille yarn is specifically recommended because its micro-fiber loops create a soft, velvety texture that looks incredibly realistic in photos, photographs beautifully for Pinterest and blogs, and feels luxurious to touch — making the finished toy feel premium and giftable right out of your hands.
Hook:
- 5.0 mm crochet hook (the standard recommended size for bulky velvet chenille amigurumi; creates a tight, stuffing-hiding fabric)
Additional Tools:
- Polyester fiberfill stuffing — enough to firmly stuff the body, head, and limbs
- 18mm green glitter or realistic-style safety eyes — 2 pieces
- Tapestry needle (for seaming and weaving in ends)
- Stitch markers (essential for tracking rounds in amigurumi)
- Scissors
- Pins (for positioning pieces before sewing)
The 5.0 mm hook is specifically chosen to create a fabric tight enough that the fiberfill stuffing does not show through the velvet loops while keeping your tension comfortable and consistent throughout the project.
Skill Level
Level: Beginner-Friendly Intermediate Recommended For: Crocheters who know the magic ring, single crochet, increases, and decreases Time Estimate: 4–6 hours total Finished Dimensions: Approximately 10–11 inches tall (sitting position, fully stuffed)
This project is ideal as a stepping stone into amigurumi. All pieces are crocheted in continuous rounds using the magic ring start. The pattern uses single crochet almost exclusively, so the stitch variety is minimal. Assembly is the skill that grows the most with this project.
Step-by-Step Tutorial
Step 1: Crochet the Body
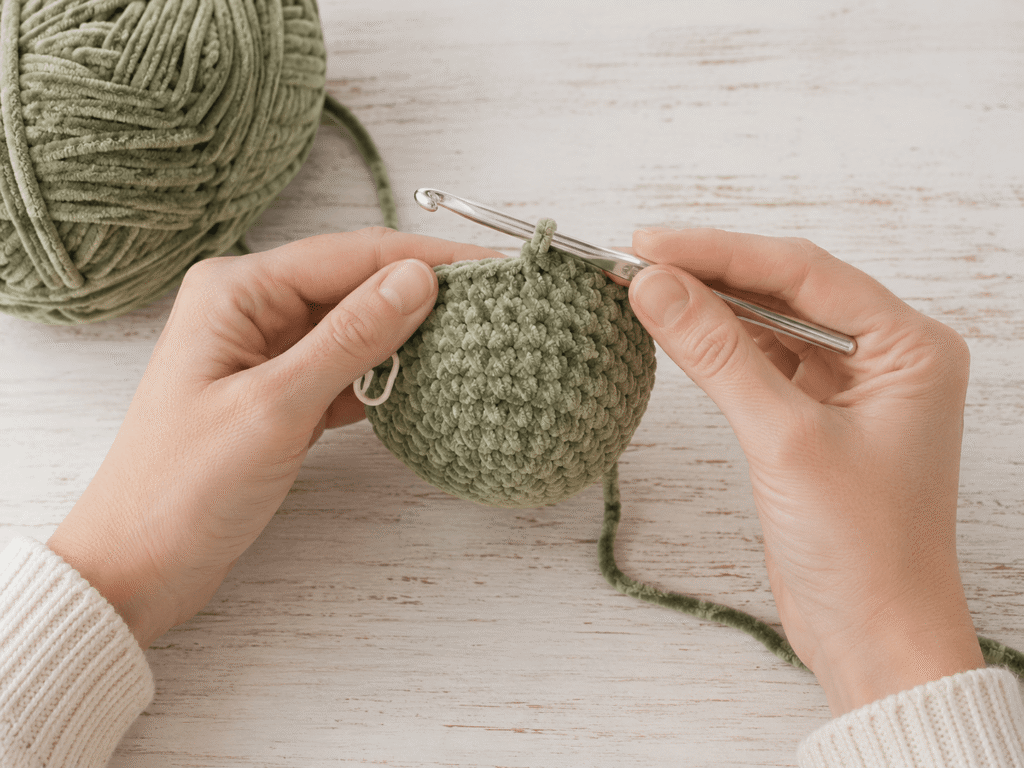
Start with your olive sage green velvet chenille yarn and your 5.0 mm hook. Create a magic ring and work 6 single crochets into the ring. Pull the ring closed tightly.
Round 2: Work 2 single crochets into every stitch around — 12 stitches total. Round 3: Alternate between 1 single crochet and 2 single crochets in each stitch — 18 stitches. Round 4: Work 1 single crochet in each of the next 2 stitches, then 2 single crochets in the next stitch — repeat around — 24 stitches. Round 5: Repeat the increase pattern to reach 30 stitches. Rounds 6–20: Work single crochet in every stitch with no increases or decreases. This creates the tall cylindrical body. Begin decreasing from Round 21 to close the top of the body, stuffing firmly with polyester fiberfill as you go. Fasten off and leave a long tail for seaming. The finished body should be plump and firm, roughly 5–6 inches tall in olive sage green velvet chenille.
Step 2: Crochet the Head
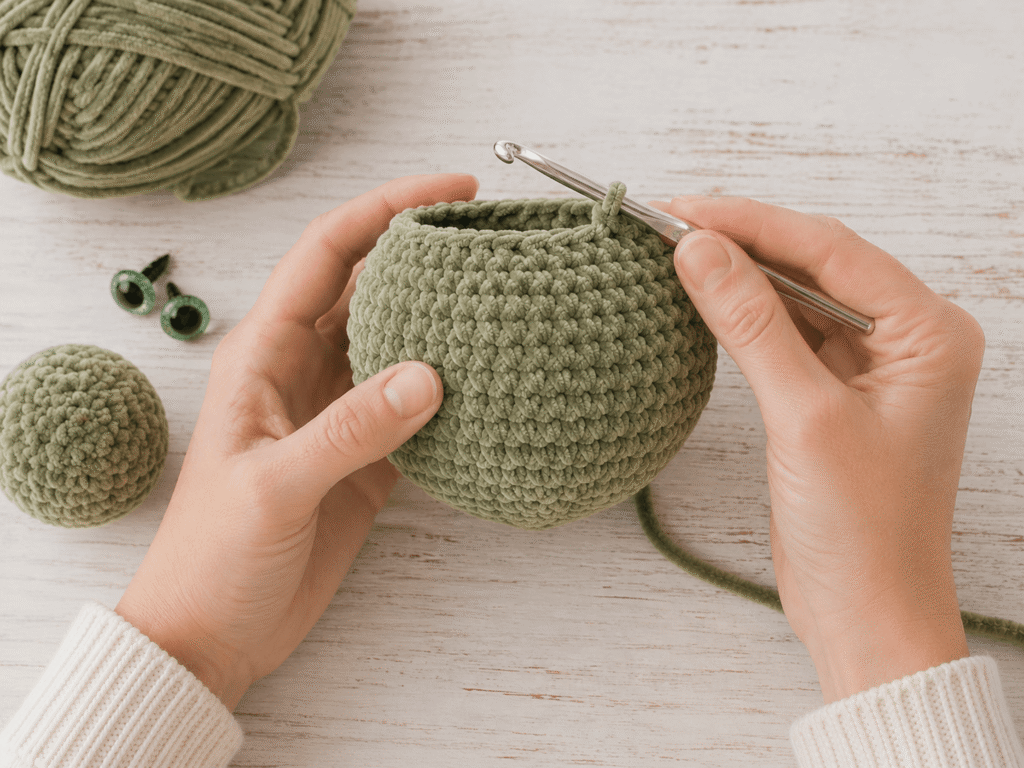
Still using olive sage green velvet chenille and your 5.0 mm hook, create a new magic ring and work 6 single crochets into it.
Follow the same increase rounds as the body until you reach 36 stitches, creating a round, full sphere shape. Continue working even rounds for 8–10 rounds to build the head width. Begin decreasing and insert your 18mm green safety eyes between rounds 12 and 13, approximately 8–10 stitches apart, before the opening gets too small. Stuff the head firmly and fully with polyester fiberfill as you decrease. Fasten off with a long tail for attachment. The head should be noticeably larger than the body — this is intentional for the classic amigurumi big-head look.
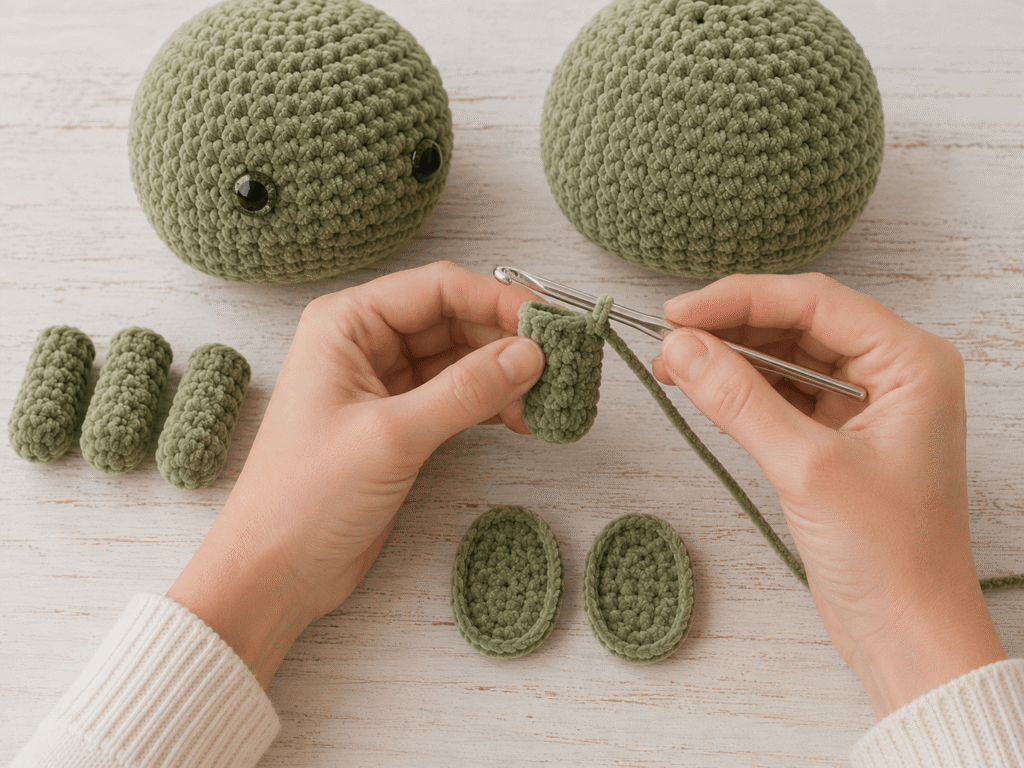
Step 3: Crochet the Limbs and Ears
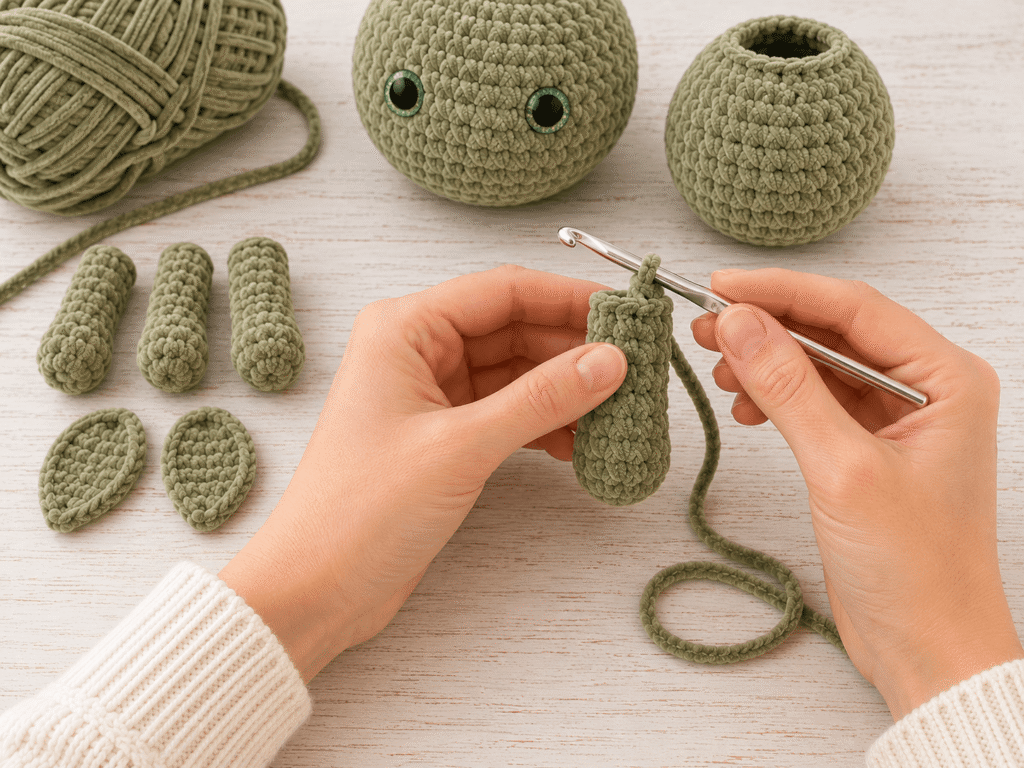
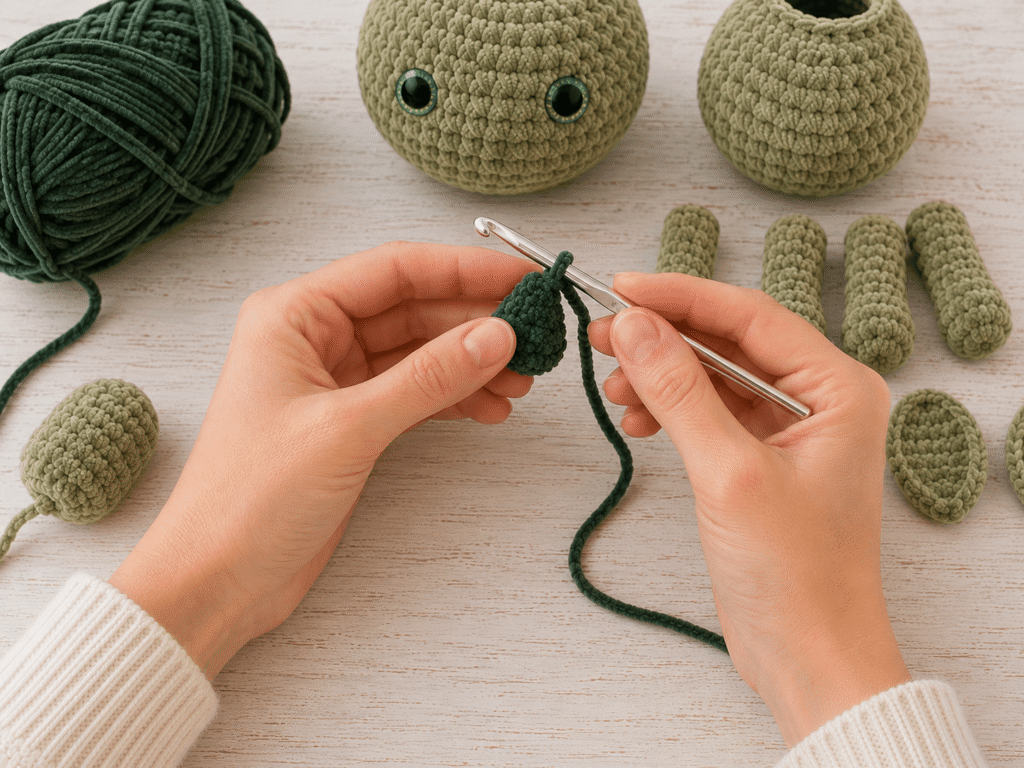
Using olive sage green velvet chenille and your 5.0 mm hook, crochet 4 identical limbs. Each limb starts with a magic ring, increases to 12 stitches, then works even rounds for 10–14 rounds depending on whether it is an arm or a leg. Legs are worked slightly longer than arms.
For the two small ears, work a magic ring with 6 single crochets, increase to 12 stitches across 2 rounds, then fold and sew flat. Do not stuff the ears — they should remain flat and floppy.
All limbs and ears are in the same olive sage green velvet chenille, maintaining perfect color consistency with the body and head throughout.
Step 4: Crochet the Horn and Nose
Switch to your dark forest green velvet chenille yarn for the horn. Work a magic ring with 4 single crochets, increase gradually over 4–5 rounds, then work 2 even rounds. This creates a small rounded cone shape. Fasten off with a long tail. The horn will sit centered at the top of the head.
For the nose/snout, return to olive sage green velvet chenille. Work a small oval or rounded rectangle shape — approximately 8–10 stitches wide — increasing slightly in the center and decreasing back down. Stuff lightly and fasten off. The snout gives the Dino Lilaf its distinctive dinosaur face shape.
Step 5: Assemble All Pieces
Lay all completed pieces on your workspace in front of you: body, head, 2 arms, 2 legs, 2 ears, 1 horn, and the snout. Use straight pins to position everything before sewing.
Attach the head to the top center of the body using your tapestry needle and olive sage green yarn. Sew through multiple attachment points in a circular pattern to ensure the head sits firmly and evenly. Attach arms to the upper sides of the body, legs to the lower sides. Position ears on the top sides of the head and sew flat. Attach the dark forest green horn centered between the ears. Finally, attach the snout slightly below and between the safety eyes.
Step 6: Add Embroidery Details
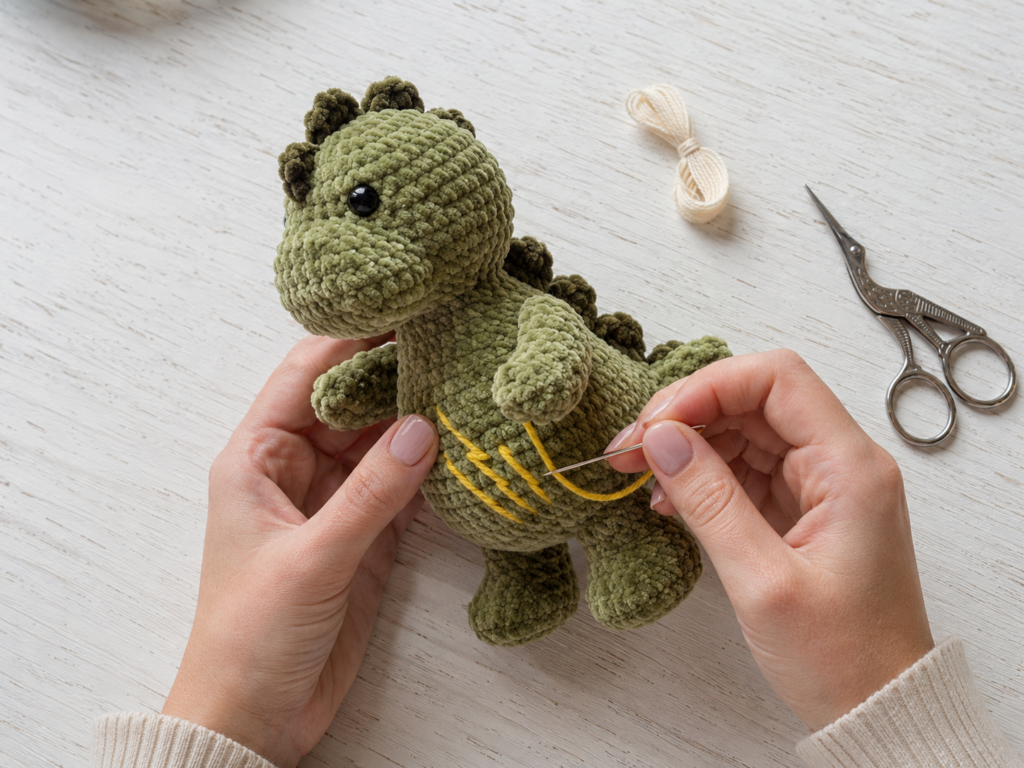
The embroidery details are what give the Dino Lilaf its personality and make it look truly finished. Thread your tapestry needle with bright yellow embroidery floss or thin yellow yarn.
On the front of the belly, embroider a small zigzag or claw-scratch pattern — 3 short diagonal lines crossing each other — exactly as visible in the reference photo. This is the signature belly marking of the Dino Lilaf.
Thread off-white or cream embroidery floss and add 3–4 short straight stitches across the tip of each foot and hand to create the claw markings. These small white details make the hands and feet look dimensional and realistic.
Weave in all remaining yarn ends with your tapestry needle. Give your finished Dino Lilaf a gentle squeeze to redistribute the stuffing evenly. Your dinosaur is complete.
Helpful Tips
Use a smaller hook than the yarn label suggests. For amigurumi, going down one hook size (5.0 mm instead of 5.5 mm) creates a tighter fabric that hides your stuffing and gives cleaner stitch definition, which is especially important with chenille yarn.
Always use stitch markers in amigurumi. Because you work in continuous rounds without turning, it is extremely easy to lose your place. A simple locking stitch marker moved up each round will save you from constant recounting.
Stuff gradually as you go. Do not wait until the end to stuff — add fiberfill as your piece grows. This lets you feel whether the density is right and prevents overstuffing or understuffing at the last minute when the opening is too small.
Velvet chenille can be slippery. If your stitches feel looser than usual, try a bamboo or wooden hook rather than a metal one — the slight grip helps with tension control.
Pin before sewing. Always use straight pins to position your limbs, ears, and horn on the assembled body before committing to any seaming stitches. Stepping back and looking from a distance before you sew anything down will save you from an asymmetrical finished toy.
Common Mistakes to Avoid
Skipping the magic ring. Beginners sometimes use a slip knot chain-2 start instead of a proper magic ring, which leaves a visible hole at the top of the head or bottom of the body. Always use a magic ring for amigurumi and pull it fully closed before continuing.
Not checking safety eye placement before closing. Once the head is fully closed and stuffed, you cannot reposition the safety eyes without cutting your work open. Insert and lock safety eyes while you still have a 6–8 stitch opening remaining. Hold the head up, look at it from the front, and confirm the placement looks symmetrical before locking the washers.
Understuffing the body. A soft, barely stuffed amigurumi will not hold its shape and will look flat and deflated. Stuff the body and head more firmly than feels natural — it will settle with use and hugging.
Pulling embroidery floss too tight. The belly zigzag and toe claw markings look best when the embroidery lies flat on the surface of the yarn. If you pull the floss too tight, it will pucker the velvet pile and look messy. Work with a gentle consistent tension.
Sewing pieces at the wrong angle. Arms should point slightly downward and forward, not straight out to the sides. Legs should point straight down. The head should face forward, not tilt. Take time during assembly to align everything before sewing, checking from multiple angles.

Final Thoughts
The Dino Lilaf Baby Dinosaur Amigurumi is one of those projects that feels impressive to make and genuinely special to give. The combination of soft olive sage green velvet chenille, those gorgeous green safety eyes, and the playful yellow belly embroidery creates a finished toy that looks boutique-quality and completely handmade with love.
Whether this is your first amigurumi or your fiftieth, this pattern is satisfying to work through and beautiful to display. It makes a perfect baby shower gift, birthday present, or handmade holiday gift — and once you make one, you will absolutely want to make another in a different color.
Happy crocheting, and enjoy every stitch of your Dino Lilaf.
Save This Pattern for Later
Did you love this free dinosaur amigurumi pattern? Do not lose it — save it to your Pinterest crochet board right now so you can come back to it anytime. This pattern is completely free and always will be, so share it with a crafty friend who would love to make one too. Tag your finished Dino Lilaf on Pinterest so the whole crochet community can see your beautiful work. The more this pattern gets saved and shared, the more free patterns I can create for you — so every save truly helps. Pin it, make it, and share your finished dinosaur with pride.