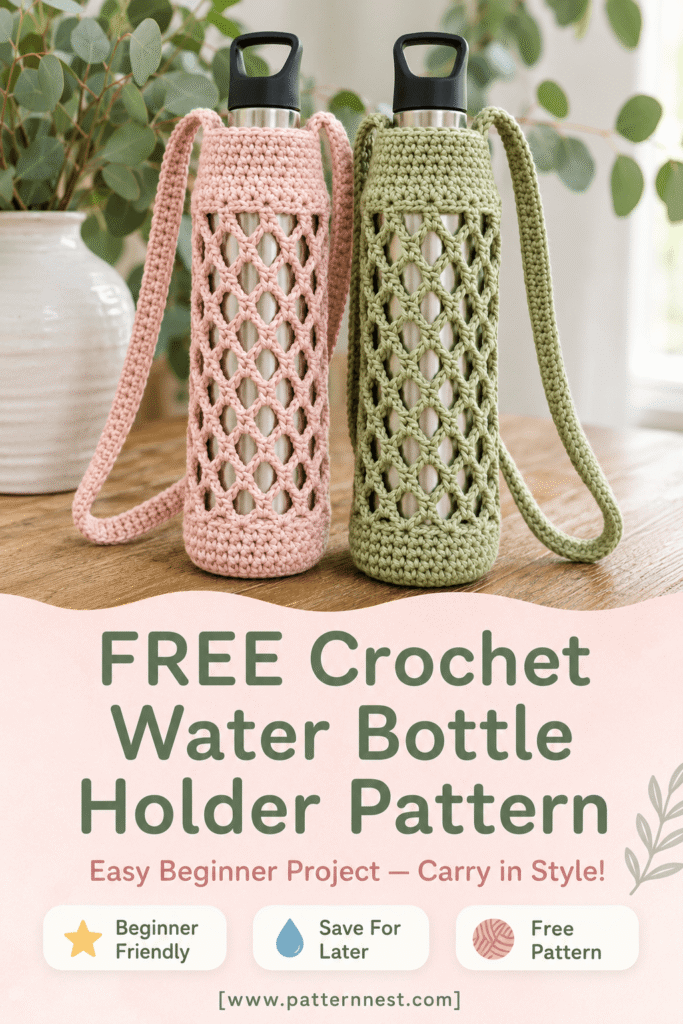
SUMMER DAYS WATER BOTTLE HOLDER
| Field | Details |
|---|---|
| Project Name | Summer Days Water Bottle Holder |
| Project Type | Crochet Water Bottle Holder / Carrier with Shoulder Strap |
| Skill Level | Beginner |
| Estimated Completion Time | 3–5 hours per holder |
| Finished Size | Fits a standard 20–32 oz water bottle or Hydro Flask; approximately 9–10 inches tall × 3.5 inches diameter at base |
| Recommended Yarn Type | 100% cotton worsted weight — smooth, structured, and machine washable |
| Recommended Yarn Weight | Worsted weight (Category 4) |
| Recommended Hook Size | 5.0 mm (H/8) crochet hook |
| Color Option 1 | Soft Pink / Blush Pink — a warm, light bubblegum pink (the primary tutorial color) |
| Color Option 2 | Sage / Moss Green — a soft, muted yellow-green (shown as a companion colorway) |
| Construction | Worked in the round from the base upward: solid sc base circle → open V-stitch mesh body → solid sc top rim → long flat shoulder strap attached at opposite sides of the top rim |
| Stitch Pattern | Body: V-stitch (dc, ch 1, dc into same space) creating the open mesh lace look; Base and rim: solid single crochet rounds |
| Strap | Long flat strap of single crochet rows, approximately 36–40 inches long, attached at two opposite points on the top rim |
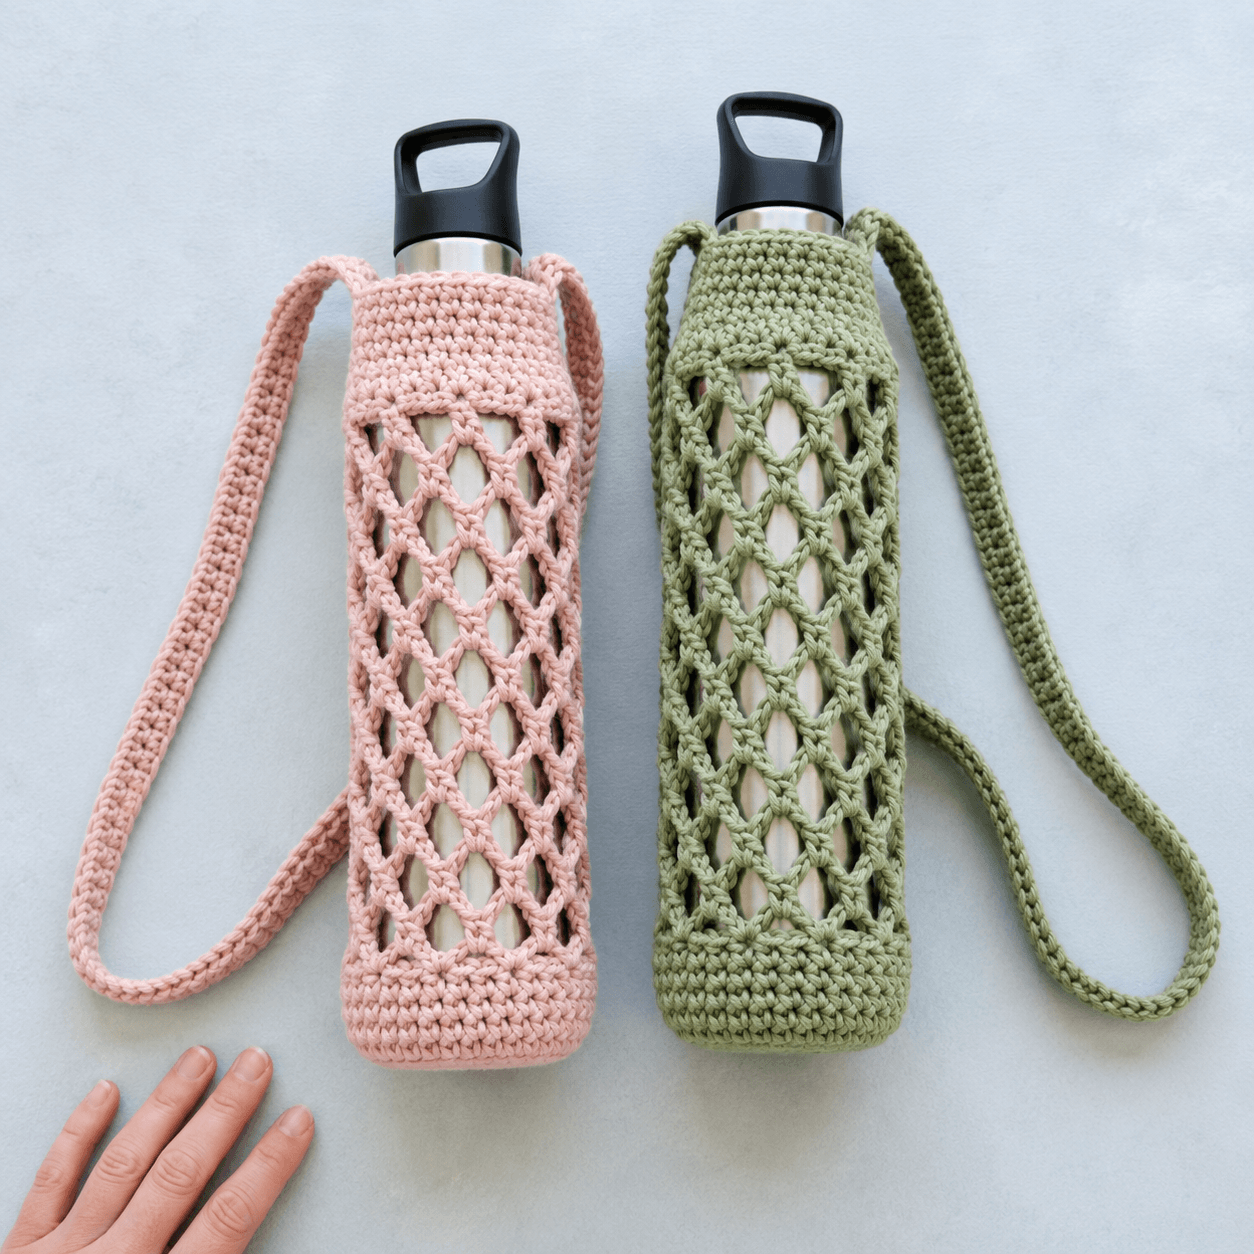
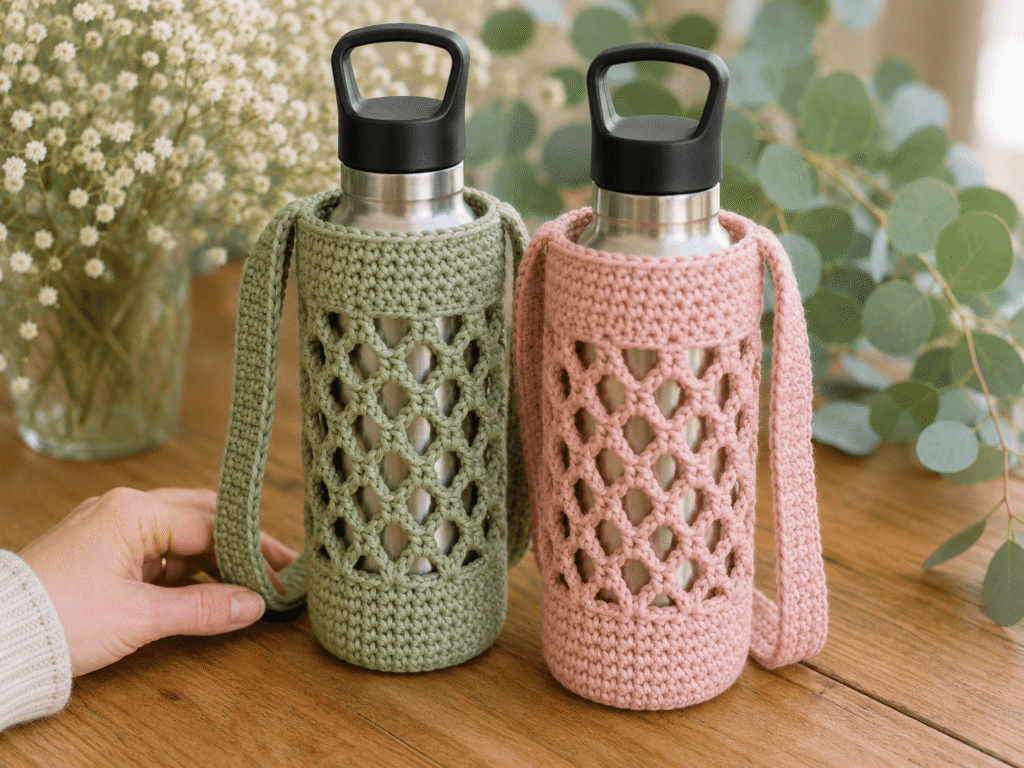
| Photography Environment — Image 1 | Flat lay on a clean light blue/grey matte surface — both Pink and Green holders laid flat beside each other with water bottles inside, straps stretched out alongside, overhead shot, bright even natural light (matching Image 1 reference) |
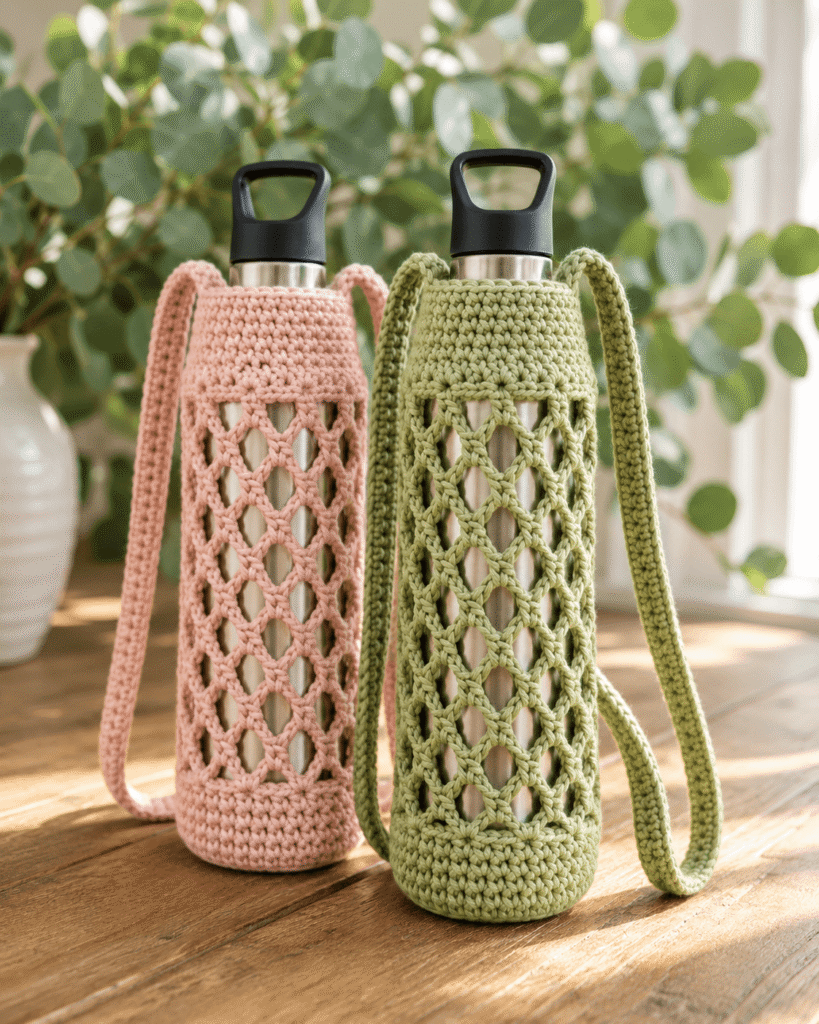
| Photography Environment — Image 2 | Warm lifestyle setting — warm honey-toned wood table surface, both holders standing upright side by side with water bottles inside, lush green eucalyptus or baby’s breath arrangement in the soft background, warm natural daylight (matching Image 2 reference) |
| Target Audience | Beginner crocheters, active women, eco-conscious crafters, summer accessory makers, back-to-school gift makers, anyone who carries a reusable water bottle daily |
Summer Days Crochet Water Bottle Holder: A Free Beginner Pattern
Hydration is non-negotiable. Style, apparently, is also non-negotiable — which is why you need a handmade crochet water bottle holder that keeps your bottle at your side and makes your outfit look intentional at the same time.
The Summer Days Water Bottle Holder is a fast, beginner-friendly crochet pattern that creates a stretchy, open-mesh lace body that fits most standard 20 to 32 oz water bottles and Hydro Flasks, a solid base that supports your bottle securely, and a long shoulder strap that lets you carry hands-free to the gym, the farmers market, school pickup, or a summer walk.
Made in smooth worsted cotton in Soft Pink or Sage Green — or both, because making two takes barely more time than one — these holders are the kind of handmade accessory that people notice and immediately ask you to make for them.
The pattern is genuinely beginner-friendly. The base is solid single crochet rounds. The body is a simple repeating V-stitch that creates the beautiful open mesh in just one step. The strap is straightforward sc rows. If you can crochet a circle and a V-stitch, you can make this holder before the weekend is over.
Frequently Asked Questions
Is this water bottle holder pattern beginner friendly?
Yes — genuinely beginner friendly. The three elements of this holder (base, body, strap) each use simple, foundational crochet techniques. The circular base uses standard sc increase rounds. The open mesh body uses the V-stitch — a (dc, ch 1, dc) all worked into the same space — which is beginner-accessible and creates beautiful lacy results immediately. The strap is flat sc rows. There are no complex joins, no invisible decreases, no challenging seams. If you have made any circular crochet project before, this pattern will feel comfortable from the first round.
What yarn works best for a water bottle holder?
A smooth, structured worsted weight cotton is the ideal choice for this project. Cotton is naturally moisture-resistant and machine washable — both important for something that will be used daily with a water bottle that may be wet or sweaty on the outside. It also has just enough natural stretch in the V-stitch pattern to snugly accommodate a range of bottle sizes without being rigid. Lion Brand 24/7 Cotton, Drops Safran, Paintbox Simply DK Cotton (in a worsted equivalent), or Scheepjes Catona worsted are all excellent choices. Avoid acrylic for this project — it lacks the structural integrity that keeps the holder its shape against the weight of a full water bottle.
What size water bottle will this holder fit?
The pattern is designed to fit standard 20 oz, 24 oz, and 32 oz water bottles — including popular brands like Hydro Flask, Nalgene, Simple Modern, and most standard stainless steel bottles. The V-stitch mesh body has natural elasticity that allows it to stretch slightly to accommodate different bottle diameters. For a slim 20 oz bottle, the holder will be slightly looser; for a 32 oz wide-mouth bottle, the mesh will be slightly stretched — both look beautiful and hold the bottle securely. If you want a snugger fit for a specific bottle, work the base rounds to match your bottle’s base diameter exactly before beginning the mesh body.
How long does this water bottle holder take to crochet?
Most beginners complete a single holder in 3 to 5 hours. The circular base takes approximately 30 to 45 minutes. The V-stitch mesh body — the longest section — takes approximately 2 to 3 hours. The strap takes approximately 45 minutes to 1 hour. Making a second holder in the companion color takes noticeably less time because the pattern rhythm is already internalized — plan for 2 to 3 hours for the second one.
Can I make a set as a gift?
Absolutely — and making a matched set in two colors (like the Pink and Green shown in the reference images) is one of the most impressive quick handmade gift combinations you can make. Nestle a reusable stainless steel water bottle inside each finished holder, tie the strap in a loose bow, and gift them as a pair. This is a perfect birthday gift, teacher gift, bridesmaid gift, or back-to-school set that is both beautiful and genuinely practical.
Materials Needed
The following materials will give you the most structured, beautiful, and long-lasting version of this water bottle holder.
Yarn — per holder:
- Main Color: Soft Pink or Sage Green worsted weight cotton — approximately 150–175 yards per holder. The Pink and Green holders shown use the same quantity of yarn in their respective colors.
For a matching set of both colors: approximately 150–175 yards of each color — 300–350 yards total.
Tools and Notions:
- 5.0 mm (H/8) crochet hook
- Scissors
- Tapestry needle — for weaving in all ends
- Stitch markers — to mark the beginning of each round and to mark the two strap attachment points on the top rim
- Measuring tape — to check the base diameter against your bottle and the body height as you work
Why cotton? Cotton holds its structure under the weight of a full water bottle — acrylic yarns can stretch and sag, which causes the holder to lose its shape. Cotton also wipes clean easily, dries quickly, and can be machine washed on a gentle cycle, making it ideal for a daily-use accessory.
Skill Level
Skill Level: Beginner Stitches Used: Magic ring, Single crochet (sc), Increase (inc), Double crochet (dc), V-stitch (dc, ch 1, dc into same space), Chain (ch), Slip stitch (sl st) Estimated Time: 3–5 hours per holder Finished Dimensions: Approximately 9–10 inches tall (body only, not strap); base approximately 3.5 inches diameter; strap approximately 36–40 inches long
Step-by-Step Tutorial
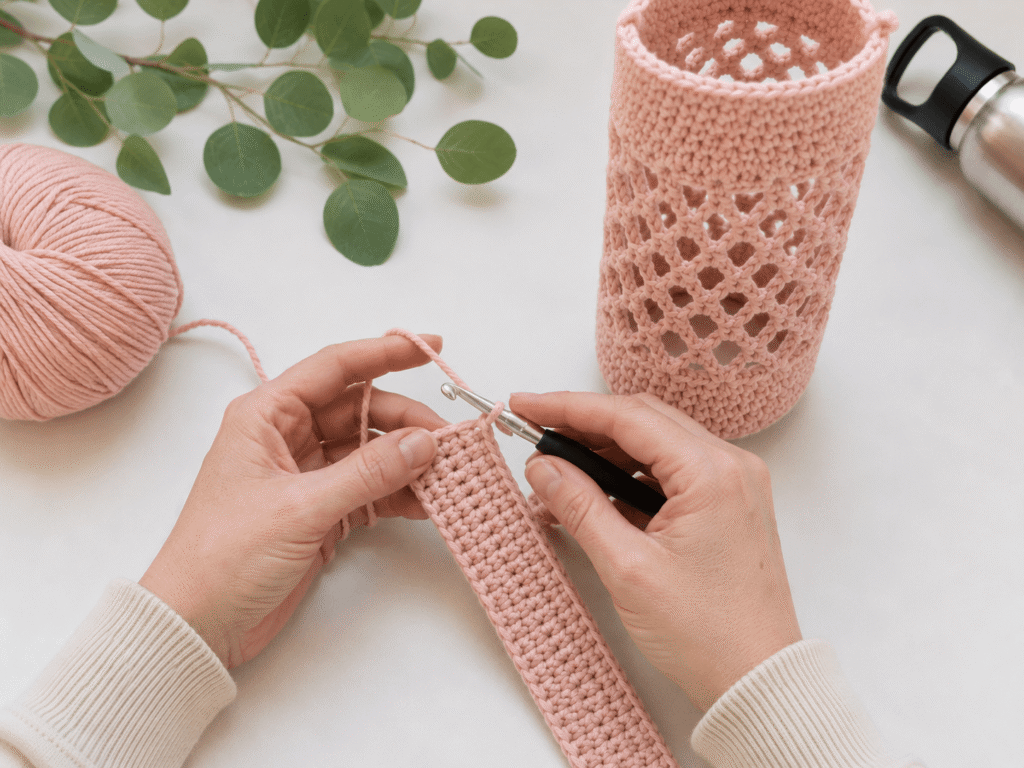
Step 1: Crochet the Solid Base in Soft Pink
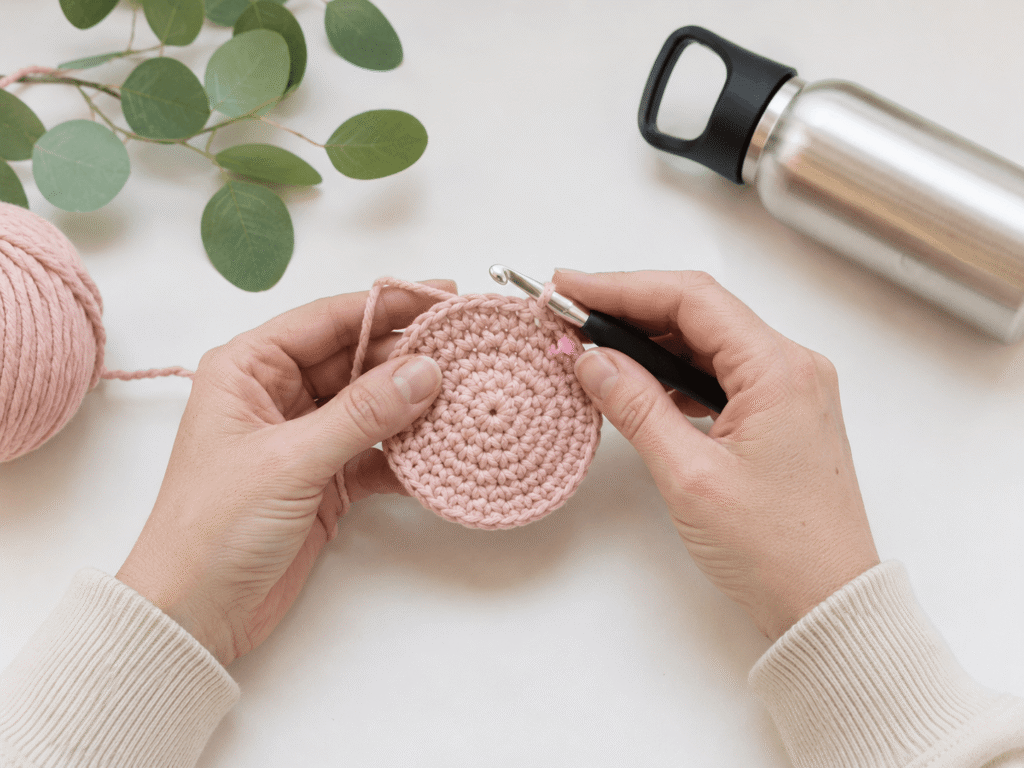
The solid base is the foundation of the holder — it needs to be dense enough to support the weight of a full water bottle and flat enough to sit stably on a surface.
Using Soft Pink cotton and your 5.0 mm hook, make a magic ring.
Round 1: Work 6 sc into the ring. Pull closed. Join with sl st. (6 sc) Round 2: Ch 1. Inc in each stitch around. Join. (12 sc) Round 3: Ch 1. *Sc 1, inc* repeat. Join. (18 sc) Round 4: Ch 1. *Sc 2, inc* repeat. Join. (24 sc) Round 5: Ch 1. *Sc 3, inc* repeat. Join. (30 sc) Round 6: Ch 1. *Sc 4, inc* repeat. Join. (36 sc)
Your base should measure approximately 3 to 3.5 inches in diameter at this point. Hold your water bottle upside down with its base against the crocheted circle — the base should cover the bottle bottom with a small amount of extra coverage. If your bottle base is larger, continue working one more increase round: *Sc 5, inc* repeat. (42 sc)
The solid sc base creates a dense, flat platform that holds the bottle stable and prevents the V-stitch mesh from stretching under the weight.
Step 2: Work the Transition Round and Begin the V-Stitch Body
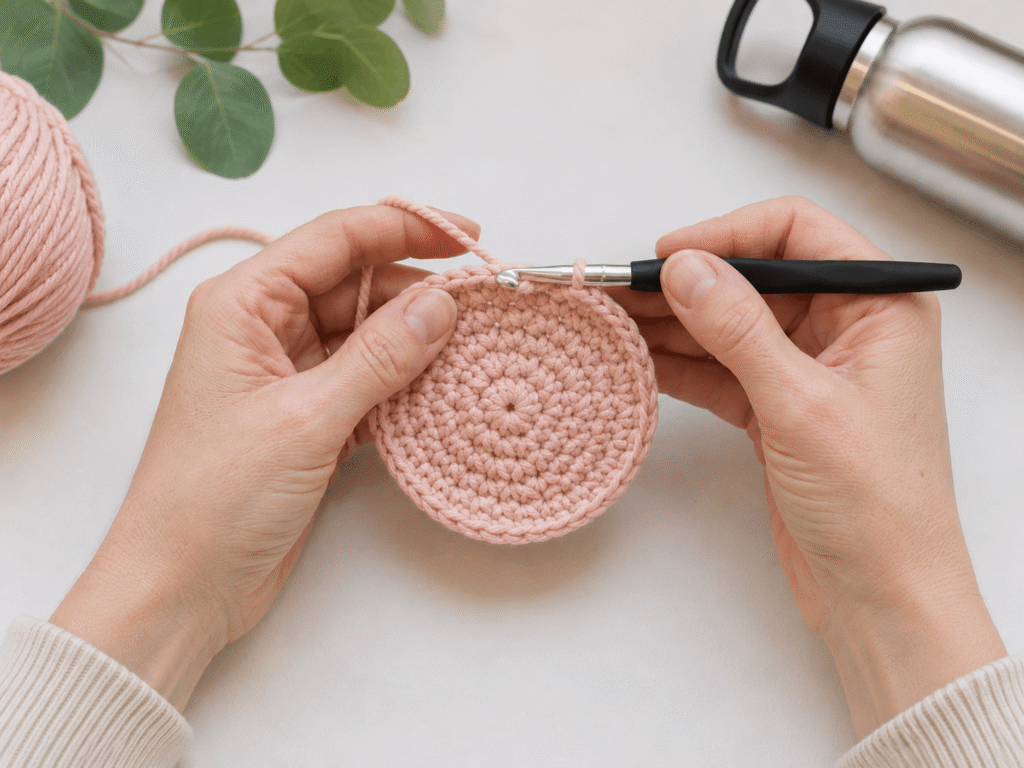
Before beginning the open mesh body, work one round of sc without increases to create the side wall of the base and establish the upright structure.
Transition round: Ch 1. Working into the back loops only of every stitch of the last base round — sc in each stitch around. Join. (36 sc)
Working into back loops only creates a clean horizontal ridge that forms the defined edge between the flat base and the upright body. This ridge is visible in the reference images as a neat dividing line.
V-stitch body setup: Ch 4 (counts as dc + ch 1). *Skip 1 stitch, (dc, ch 1, dc) into the next stitch — this is one V-stitch. Skip 1 stitch.* Repeat around. Join to the 3rd chain of the starting ch-4. This sets up the V-stitch pattern around the full circumference.
The V-stitch creates the immediately recognizable open mesh body — each V-stitch is a (dc, ch 1, dc) pair worked into the same stitch, creating a V-shaped opening that gives the holder its beautiful lacy appearance.
Step 3: Continue the V-Stitch Body to Full Height
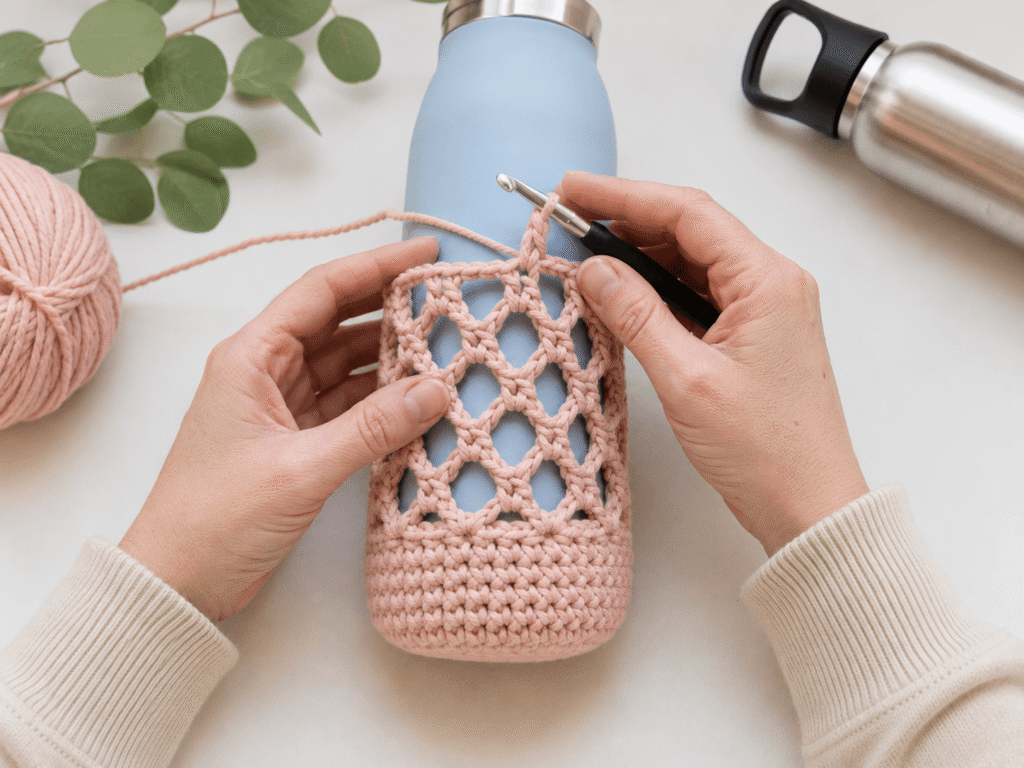
Continue working V-stitch rounds upward, working each new round’s V-stitches into the ch-1 spaces of the previous round’s V-stitches.
V-stitch body rounds: Ch 4 (counts as first dc + ch 1). *(Dc, ch 1, dc) into each ch-1 space of the previous round.* Repeat all the way around. Join to 3rd chain of ch-4.
Repeat this round until the body measures approximately 8 to 9 inches tall from the base transition ridge — typically 10 to 12 V-stitch rounds depending on your individual tension and the bottle height you are fitting.
Check the height against your water bottle regularly — slide the bottle inside and check that the top of the mesh body reaches approximately to the bottle’s shoulder (the point where it begins to narrow toward the cap). The top solid rim will add a small amount of additional height.
The Soft Pink cotton should look beautiful in the V-stitch pattern — each open diamond of mesh framing the color of the bottle beneath it.
Step 4: Work the Solid Top Rim
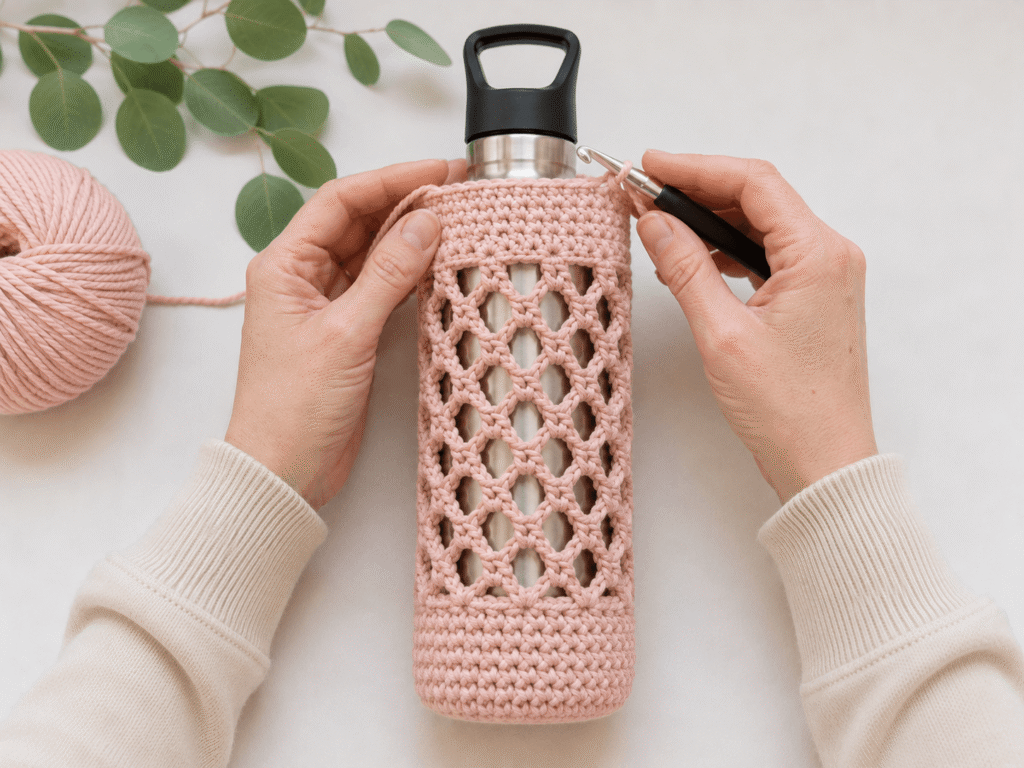
The solid top rim secures the top of the holder, prevents the mesh from unraveling, and creates the stable structure that the shoulder strap attaches to.
Top rim Round 1: Ch 1. Work 1 sc into each dc and 1 sc into each ch-1 space around the full top edge. Join. Count your stitches — you should have a consistent count matching your base circumference.
Top rim Round 2: Ch 1. Sc in each stitch around. Join.
Top rim Round 3: Ch 1. Sc in each stitch around. Join. Fasten off.
The three rounds of solid sc at the top create a clean, defined rim that holds the holder’s shape at the opening and gives the strap attachment points the structural strength they need. The Soft Pink top rim creates a pleasing visual bookend to the Soft Pink base — solid at both ends, open and airy in the middle.
Step 5: Make and Attach the Shoulder Strap
The long shoulder strap is what makes this holder hands-free and genuinely practical for daily use.
Strap construction: Using Soft Pink cotton and your 5.0 mm hook, chain 10 (for a strap approximately 1 inch wide). Row 1: Sc in 2nd chain from hook and across. (9 sc). Ch 1, turn. Rows 2 onward: Sc across. Ch 1, turn.
Continue working sc rows until the strap measures 36 to 40 inches in total length — this is enough to wear comfortably over the shoulder or across the body. For a shorter wrist strap only, work to 12 to 14 inches. Fasten off, leaving a long tail for attachment.
Attach the strap: Identify two opposite points on the top rim of the holder — directly across from each other. Using your tapestry needle and Soft Pink yarn, stitch one end of the strap firmly to the inside of the top rim at one attachment point. Go through the strap and the rim stitches at least 4 to 5 times before knotting. Attach the second strap end to the opposite rim point identically. The strap should hang in a long loop at the same height on both sides.
Step 6: Weave in All Ends and Test
Weave in all remaining yarn ends — the magic ring tail, any joining tails, and both strap attachment tails. Work each end through at least 4 to 5 stitches in two directions and trim close to the surface.
Test the fit: Slide your water bottle into the finished holder. The V-stitch mesh should stretch slightly to accommodate the bottle and hold it snugly. The bottle should sit flat on the base with no rocking. The top rim should reach the bottle’s shoulder. The strap should hang evenly at a comfortable shoulder carry height.
If the bottle sits too loosely, the base was worked too wide — note for the next holder. If the mesh is very tight over the bottle, your tension is snug — this is fine; the cotton will ease with use.
Machine wash the finished holder on a gentle cold cycle and lay flat to dry to maintain shape and color.
Helpful Tips
- Match your base size to your specific bottle. The most important measurement in this pattern is the base diameter. Before working the full base, place your actual water bottle upside-down on a flat surface and trace around the base. Work your sc increase rounds until the circle matches your traced line. This ensures a snug, stable fit regardless of your bottle brand.
- Work the back-loop-only transition round carefully. The BLO transition round between the base and the body is what creates the clean, defined edge you see in the reference images. If you skip it and work the V-stitch directly into the base, the mesh will sag and the holder will look shapeless. This single round makes a significant visual difference.
- Keep V-stitch tension consistent throughout the body. The open mesh body should look even — each V-stitch the same size as the one before and after it. Inconsistent tension creates V-stitches of different sizes, giving the mesh an uneven appearance. If you tend to work more loosely as a session continues, check your tension every 3 to 4 rounds.
- Make the strap longer rather than shorter. A strap that is too short to wear comfortably over the shoulder is the most common complaint about water bottle holders. Work the strap to at least 36 inches before measuring it on your own body — hold one end at the attachment point and measure over your shoulder and across to where the other attachment point would be. Adjust if needed before fastening off.
- Make both colors at the same time. If you plan to make the Pink and Green set, work them in parallel — complete the base on both, then the body on both, then the strap on both. This keeps the tension and pattern rhythm consistent between the two holders and produces a more matched-looking set than making them back to back.
Common Mistakes to Avoid
- Skipping the magic ring in favor of a chain ring. A chain ring leaves a visible hole at the base center that weakens the structure and looks unfinished. Always use a magic ring for the base — it closes completely and gives the holder a solid, stable center.
- Working V-stitches into the dc tops instead of the ch-1 spaces. On every V-stitch body round above the first, each new V-stitch must be worked into the ch-1 space of the previous round’s V-stitch — not into the dc stitches. Working into the dc tops collapses the mesh and produces a very different, denser fabric.
- Making the body too short. A body that does not reach the bottle’s shoulder will leave the bottle top unsupported and the holder will slide down the bottle during carry. Measure against your actual bottle before fastening off the body — always add one more round when in doubt.
- Attaching the strap unevenly. If the two strap attachment points are not exactly opposite each other on the top rim, the holder will tilt to one side when carried and the bottle will lean. Use stitch markers to identify the exact opposite points before stitching the strap — count around the rim and mark the stitch directly across.
- Using acrylic yarn. Acrylic stretches under sustained weight and will cause the holder to sag, distort, and lose its shape quickly with daily use. Cotton is non-negotiable for a functional water bottle holder. If cotton is unavailable, a cotton-acrylic blend with at least 50% cotton is an acceptable alternative.
Final Thoughts
The Summer Days Water Bottle Holder is the perfect example of crochet at its most practical and most beautiful at the same time. It is quick to make, endlessly customizable, genuinely useful every single day, and the kind of handmade accessory that sparks a conversation wherever you carry it.
Make one for yourself in your favorite color. Make a second in a companion color for a friend. Make a set of four in different shades and give one to every person at the table. However you make them, these holders will be carried, loved, and used — which is exactly what handmade things deserve.
Save This Pattern For Later
Love this water bottle holder? Pin it to your Crochet Bags & Accessories or Summer Crochet Projects board on Pinterest right now so you always have it when you need a fast, beautiful, practical project. Share it with every crocheter you know who carries a water bottle — which is everyone.