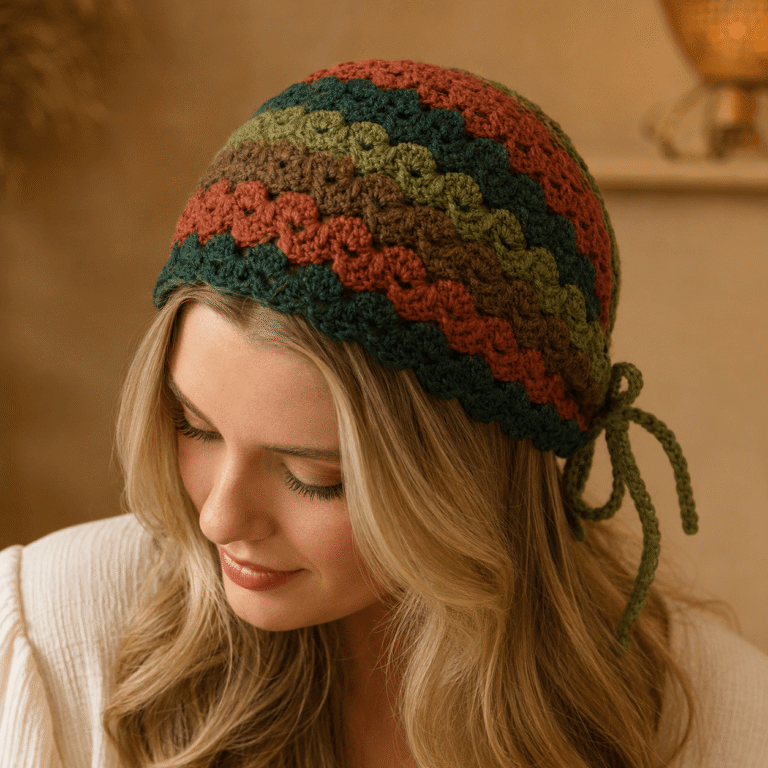
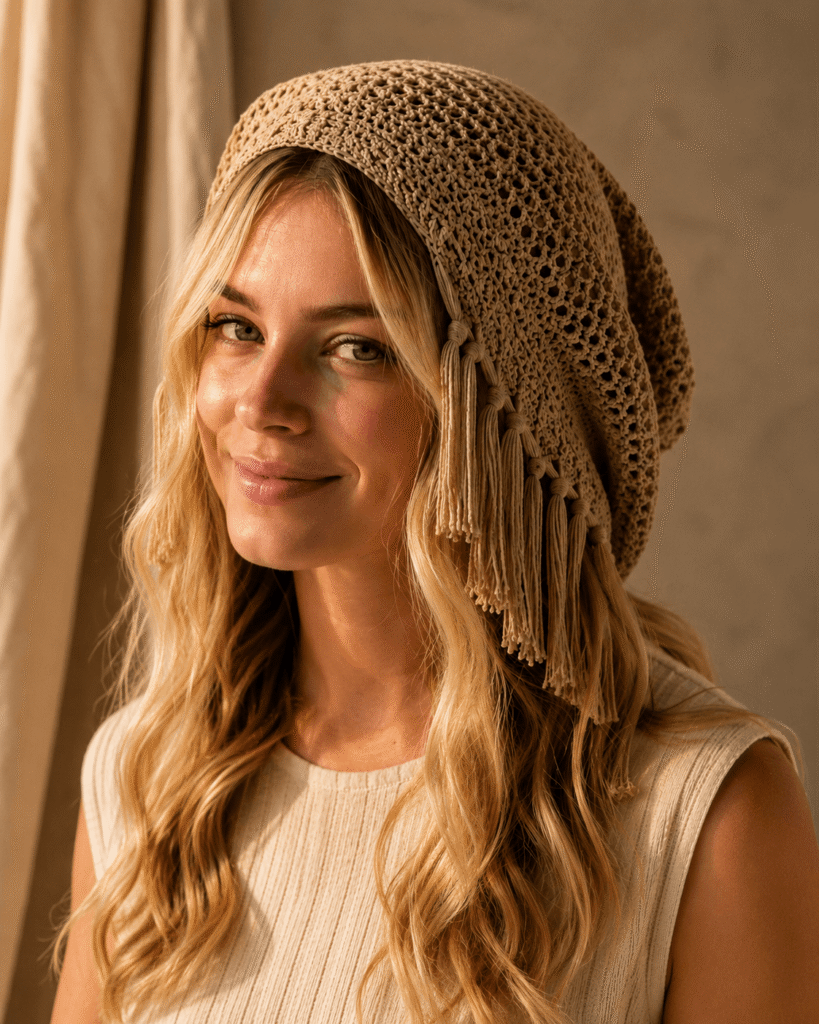
Crochet Boho Fringe Triangle Bandana Scarf

The Chicest Crochet Bandana You Can Make This Weekend — Fringe Triangle Head Scarf
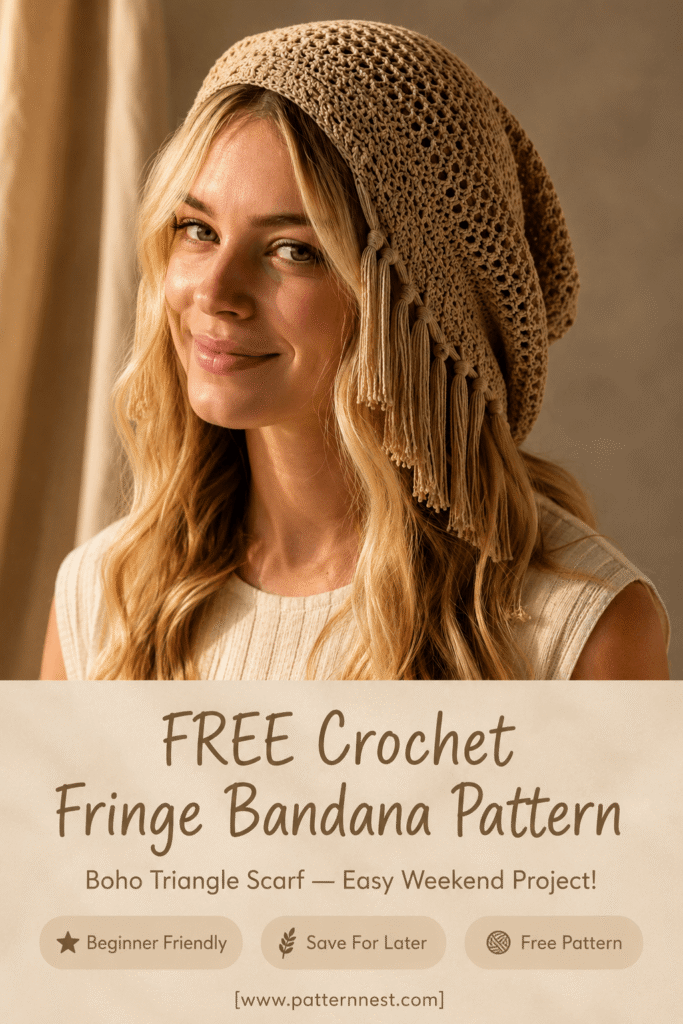
If you have been searching for a crochet project that is both genuinely easy and genuinely stunning, your search ends here. The Boho Fringe Triangle Bandana Scarf works up in a single weekend, requires only two alternating stitch types, and finishes with the most satisfying detail in crochet — knotted fringe that swings and drapes with every movement.
Made entirely in a single color of Warm Sand / Natural Oat worsted cotton, this bandana proves that you do not need complex colorwork or intricate lace to create something that looks like it came from a high-end boutique. The alternating rows of solid half double crochet and open chain-2 mesh create a beautiful striped texture — dense and structured, then airy and light, then dense again — that gives the finished bandana a visual depth that belies how simple it is to make.
The fringe is the detail that makes this piece. Each bundle is attached along both angled side edges and the lower point with a lark’s head knot, then finished with a single overhand knot a short distance from the base — a macramé-inspired touch that keeps the fringe from tangling and adds a cool, modern boho quality to the finish.
Worn draped over the head like a loose hood, this bandana is effortlessly stylish. It works for summer festivals, beach days, farmers markets, afternoon walks, or any day you want your hair out of your face with a handmade accessory doing the work.
Frequently Asked Questions
Is this fringe bandana pattern beginner friendly?
Yes — genuinely. This is one of the most beginner-friendly wearable crochet patterns you will find. The two stitches used — half double crochet and chain-2 mesh — are both foundational techniques that even very new crocheters can master quickly. The triangular shaping is achieved through simple end decreases that follow a very predictable rhythm. The fringe is arguably the easiest finishing technique in crochet — just a fold, a pull-through, and a knot. If you can chain, hdc, and count to two, you can make this bandana.
What yarn works best for this bandana?
A smooth, structured worsted weight cotton or cotton-linen blend is ideal. Cotton has the natural weight and drape that makes a bandana sit beautifully on the head and swing gently when you move. It also holds its shape well — the alternating solid and open rows stay crisp and defined in cotton in a way they would not in a stretchy acrylic. Lion Brand 24/7 Cotton in Ecru or Oatmeal, Paintbox Simply DK Cotton in a worsted equivalent, or Drops Safran are all excellent matches for the warm neutral tone and smooth texture of the yarn in the reference image. The fringe especially benefits from cotton — it hangs straight, stays separated, and has a beautiful natural weight.
How long does this bandana take to crochet?
Most beginner to intermediate crocheters complete this bandana in 6 to 9 hours including all fringe attachment. The bandana body typically takes 4 to 6 hours. The fringe attachment and knotting takes 1.5 to 2 hours and is deeply satisfying — many crafters find the rhythmic cutting, folding, attaching, and knotting of fringe to be one of the most enjoyable finishing sessions in crochet. Plan for a relaxed Saturday project — start in the morning and finish the fringe while watching a film in the evening.
What size will the finished bandana be?
The finished bandana measures approximately 24 inches across the top straight edge and 14 inches deep at the center point. Worn draped over the head, the two side corners fall to approximately shoulder level, where the knotted fringe hangs. This is a generous, relaxed fit that works as a loose hood rather than a tight bandana — the fabric drapes softly over the crown and flows back rather than sitting flush against the head. If you prefer a more fitted, shorter bandana, reduce your starting chain and work fewer rows.
Can I make this in a different color?
Absolutely. The Warm Sand / Natural Oat single-color version is a timeless neutral that matches everything — but this bandana would be equally beautiful in Terracotta for autumn, Dusty Rose for spring, Deep Olive for a forest aesthetic, Slate Blue for a cool coastal feel, or Rust Orange for a bold boho statement. Because the pattern uses a single color throughout, swapping the colorway requires no pattern changes whatsoever — just pick your skein and start.
Materials Needed
The following materials will give you the most beautiful, drapey, and durable version of this bandana.
Yarn:
- Main Color (MC): Warm Sand / Natural Oat worsted weight cotton — approximately 250–300 yards total for both the bandana body and all fringe. The fringe uses a meaningful amount of yarn — factor this in when calculating your yardage. A 200-yard skein of worsted cotton will usually cover the body; have a second partial skein ready for the fringe.
Tools and Notions:
- 5.0 mm (H/8) crochet hook — smooth aluminum or ergonomic grip; cotton benefits from a slightly larger hook than its weight suggests for a soft, drapey fabric
- Scissors — sharp craft scissors are important for cutting clean, even fringe strands
- Tapestry needle — for weaving in all yarn ends
- Stitch markers — to mark both end stitches for the decrease rows
- Ruler or fringe-cutting guide — cutting all fringe strands to the same length before attaching produces a much more even finished result; a piece of stiff cardboard 8 to 10 inches wide makes an excellent fringe-cutting guide
- Measuring tape — to check bandana dimensions as you work
- Crochet hook one size larger (5.5 mm) — useful for pulling fringe bundles through the edge stitches
Why cotton for fringe? Cotton fringe hangs straight, separates cleanly, and does not pill or fuzz with wear. The natural weight of cotton also means the fringe swings and moves beautifully rather than floating or curling. For the knotted macramé-style fringe on this bandana, cotton is significantly better than acrylic.
Skill Level
Skill Level: Beginner–Intermediate Stitches Used: Chain (ch), Slip stitch (sl st), Half Double Crochet (hdc), Chain-2 Mesh Row (dc, ch 2, skip 2, dc pattern) Estimated Time: 6–9 hours including fringe Finished Dimensions: Approximately 24 inches wide × 14 inches deep at center triangle point; fringe approximately 4–5 inches long
Step-by-Step Tutorial
Step 1: Create Your Foundation Chain
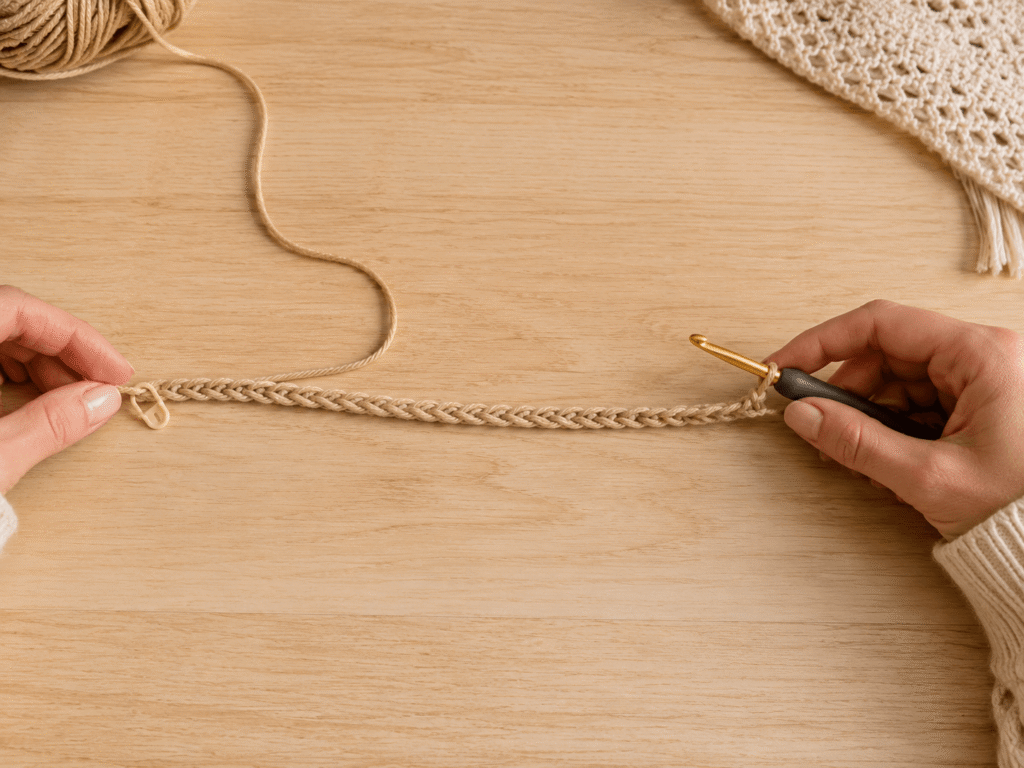
Using your Warm Sand worsted cotton and your 5.0 mm hook, make a slip knot and chain 121 stitches. This foundation chain sets the full top width of the bandana at approximately 24 inches.
Lay the chain flat and count carefully before working the first row — an inaccurate foundation chain will affect the stitch counts of every subsequent row. Place a stitch marker at both ends of the chain to mark your edges.
Row 1 (Setup — solid hdc): Hdc in the 3rd chain from the hook (the skipped chains count as the first hdc). Hdc in every remaining chain across. At the end of the row you should have 120 hdc. Chain 2 and turn.
The first solid hdc row establishes the clean, structured top edge of the bandana. The Warm Sand cotton should already look warm and clean at this stage — the smooth yarn catching the light evenly across each stitch.
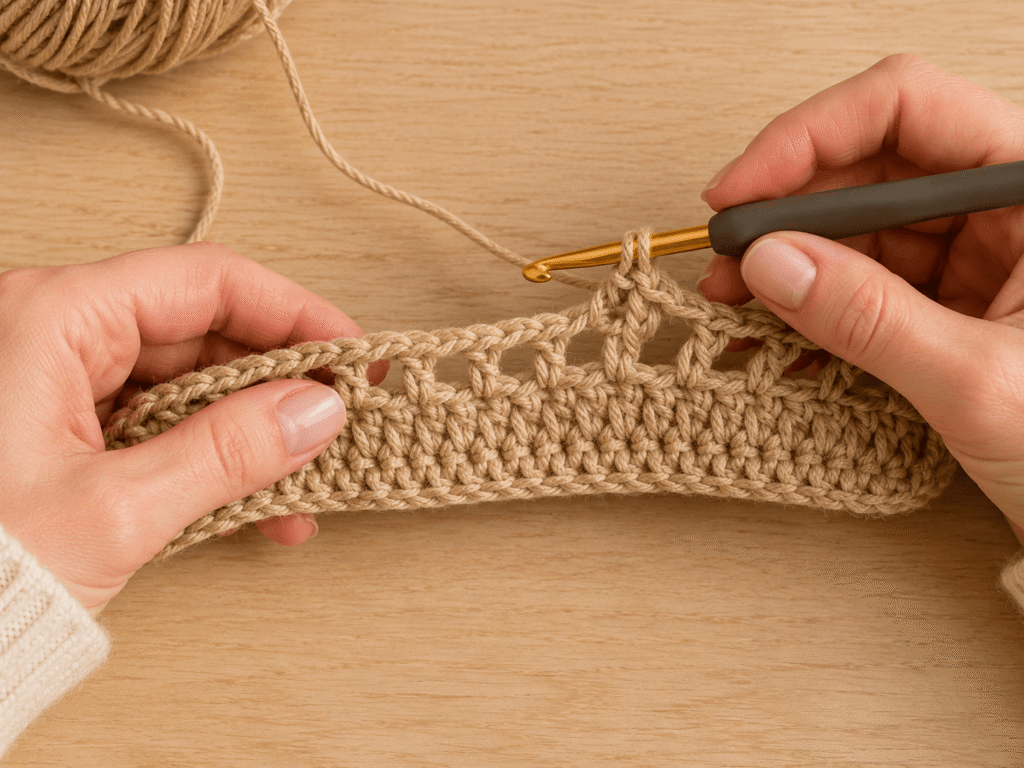
Step 2: Establish the Alternating Stitch Pattern
The visual character of this bandana comes from its alternating stitch rows — solid hdc rows alternating with open chain-2 mesh rows. This creates the beautiful striped solid-and-open texture that defines the piece.
Row 2 (Open mesh row): Chain 4, turn (counts as dc + ch 1). *Skip 2 stitches, dc in next stitch, ch 2* repeat across. End with dc in the top of the turning chain. Chain 2, turn.
The open mesh row creates the airy, see-through band in contrast to the solid hdc row below it. The chain-2 spaces create an even, clean grid of openings across the full width.
Row 3 (Solid hdc row): Hdc in each stitch and into each chain-2 space across the row. (120 hdc). Chain 2, turn.
Continue alternating: Row 4 — open mesh. Row 5 — solid hdc. Row 6 — open mesh. And so on.
This two-row repeat is the entire stitch pattern for the body of the bandana. Once established, it becomes completely automatic and deeply satisfying to work.
Step 3: Work the Triangular Shaping Decreases
Beginning at Row 3, introduce gradual decreases at both ends of every solid hdc row. This creates the triangular shape of the bandana, tapering from the full 24-inch top width down to the center bottom point.
Decrease method for solid hdc rows: At the beginning of each solid hdc row, skip the first stitch entirely (do not work into it) and hdc across to the last 2 stitches — work an hdc2tog (half double crochet two together) into the final 2 stitches. This removes one stitch from each end on every solid row.
Open mesh rows: Work the mesh rows without any decreases — the mesh adapts naturally to the slightly narrower stitch count beneath it.
Continue the alternating pattern with solid row decreases until the bandana measures approximately 13 to 14 inches deep at the center. At this point you will have approximately 30 to 40 stitches remaining across the row. Continue decreasing each solid row until you have reduced to 3 to 5 stitches.
Final point: On the last row, work hdc2tog across all remaining stitches until a single stitch remains. Chain 1 and fasten off, leaving a 6-inch tail.
Step 4: Work a Simple Border Edge
Before adding the fringe, work a simple single crochet border along both angled side edges to create a clean, even surface for fringe attachment.
Attach Warm Sand yarn at the top right corner of the bandana. Work sc evenly along the entire right angled edge from top corner to bottom point — work 1 sc into each row end, placing a sc into each hdc row end and each mesh row end. At the bottom point, work 3 sc to turn the corner. Continue sc evenly up the left angled edge to the top left corner. Join with a slip stitch or fasten off.
This border serves two purposes: it tidies and reinforces the edges, and it creates evenly spaced, firm stitches for the fringe to be attached into. Consistent border stitches produce evenly spaced, professional-looking fringe.
Step 5: Cut and Attach the Knotted Fringe
The fringe is the most satisfying and transformative step of this project. It takes approximately 1.5 to 2 hours and is completely relaxing once you find your rhythm.
Cut fringe strands: Cut a cardboard guide approximately 9 inches wide. Wrap your Warm Sand yarn around the card repeatedly, then cut along one edge to produce strands of 18 inches each. You will need enough strands to group into bundles of 6 across both full angled edges. Prepare all your strands before beginning attachment — this is much faster than cutting as you go.
Attach each fringe bundle: Take 6 strands. Fold them in half together to create a bundle with a folded loop at the top and 12 hanging strands below. Using your larger hook (5.5 mm), insert the hook through a border sc stitch, catch the folded loop, and pull it through the stitch. Then pass all 12 strand ends through the loop and pull snugly to secure — this is the lark’s head knot. The fringe bundle is attached.
Space the fringe evenly along both angled edges — approximately every 2 to 3 border stitches — and place one fringe bundle at the center bottom point.
Knot the fringe: Approximately 1 inch below each lark’s head attachment knot, tie a single overhand knot in each fringe bundle. Pull each knot snug and position it at a consistent distance from the base. This is the macramé-style knotted detail that gives the fringe its structured, intentional look — the hanging strands below the knot splay open slightly, and the knot acts as an anchor.
Trim all fringe ends to a consistent length — approximately 3.5 to 4 inches below the overhand knot — using sharp scissors. Hold the scissors horizontally and trim across all strands in a straight line for a clean, even hem.
Step 6: Final Finishing and Styling
Weave in all yarn ends using your tapestry needle — the foundation chain tail, the fastened-off point tail, and both border edge tails. Trim all tails close to the surface.
Give the fringe a final check — confirm that all bundles are securely attached, all overhand knots are at a consistent height, and all trimmed ends are even. Gently separate any fringe strands that are tangled together.
To wear: Drape the bandana over the head with the solid hdc top edge across the crown of the head. Let the two fringe sides fall naturally over the shoulders and down the sides of the face. The bandana can be worn loose as a relaxed hood, or the two side corners can be gathered and tied loosely at the nape of the neck for a more secure fit.
The Warm Sand cotton will soften slightly with every wear and wash, becoming more drapey and relaxed over time.

Helpful Tips
- Use a cardboard guide to cut all your fringe before you start attaching. Cutting fringe strand by strand as you attach takes three times as long and produces less consistent lengths. Cut every strand before you attach a single one — then enjoy the rhythmic, meditative process of attaching and knotting without interruption.
- Space your fringe bundles with a ruler. Before attaching any fringe, lay the bandana flat and use a ruler or tape measure to mark evenly spaced attachment points along both edges with a stitch marker or small safety pin. Even spacing is what separates professional-looking fringe from homemade-looking fringe.
- Work the mesh rows at a relaxed tension. The chain-2 mesh rows define the open, airy quality of the pattern. If you work them tightly, the spaces will close up and the open-closed stripe effect will be lost. Consciously work the mesh rows with a slightly more relaxed grip than your solid hdc rows.
- Trim fringe with the bandana laid flat. Trimming fringe while holding it vertically produces uneven results because the strands shift. Lay the bandana flat on a table, smooth all fringe strands downward with your hand, and trim across in a single horizontal cut. This produces a perfectly even fringe hem.
- Steam or mist the fringe lightly to straighten after attachment. Cotton fringe sometimes develops kinks at the fold point where the lark’s head knot is attached. A light mist with a spray bottle and a gentle downward smooth with your fingers straightens the fringe beautifully without any ironing required.
Common Mistakes to Avoid
- Losing stitches during mesh rows. The chain-2 mesh row uses a ch 4 turning chain that counts as both the turning chain and the first mesh unit. Many beginners forget to count this turning chain as a stitch and start working into it, which creates an extra stitch at the beginning of the following solid row. Always treat the ch-4 turning chain as your first dc + ch-2 unit.
- Decreasing on both solid and mesh rows. The decreases happen only on solid hdc rows — not on mesh rows. Decreasing on mesh rows as well will cause the triangle to narrow too quickly and the mesh pattern to lose its alignment. Keep mesh rows even throughout.
- Attaching fringe too close together. Overcrowded fringe looks heavy and tangled rather than light and swinging. Space bundles every 2 to 3 border stitches — there should be visible breathing room between each bundle. When in doubt, use slightly fewer bundles with slightly more space between them.
- Inconsistent overhand knot height. The overhand knots in the fringe are the most visible detail of the finished bandana from a distance. Knots at different heights look messy. Measure the first knot, then use that bundle as your guide for every subsequent one — holding each new bundle beside the first to match the knot position before tying.
- Skipping the edge border before attaching fringe. Attaching fringe directly to the raw row-end edge without a border row produces uneven spacing and a less secure attachment. The single crochet border creates consistent, firm anchor points and makes the fringe attachment process significantly faster and more even.
Final Thoughts
The Boho Fringe Triangle Bandana Scarf is proof that beginner crochet can be genuinely stylish. There is nothing complicated about this pattern — two stitches, one color, simple decreases, and a beautiful fringe finish. And yet the result is the kind of handmade accessory that gets noticed and admired everywhere it is worn.
Make it in Natural Oat for a classic neutral. Make it in Terracotta for autumn. Make it in Dusty Sage for a botanical moment. However you make it, you will have it finished by Sunday evening and on your head by Monday morning.
Save This Pattern For Later
Obsessed with this Fringe Bandana? Pin it to your Crochet Accessories or Beginner Crochet Projects board on Pinterest right now — this is exactly the kind of pattern you will want to make in every color. Share it with any crocheter who has been looking for a wearable project that is actually as easy as it looks.