CROCHET WAFFLE PILLOW
| Field | Details |
|---|---|
| Project Name | Kawaii Waffle Pillow |
| Project Type | Decorative Throw Pillow with Appliqué |
| Skill Level | Intermediate |
| Estimated Completion Time | 8–12 hours |
| Finished Size | Approximately 14 × 14 inches square (fits a 14-inch pillow insert) |
| Recommended Yarn Type | Chenille / velvet plush polyester yarn — creates the squishy, textured waffle grid surface |
| Recommended Yarn Weight | Bulky chenille (Category 5–6) |
| Recommended Hook Size | 5.0 mm (H/8) crochet hook |
| Main Color (MC) | Warm Chocolate Brown — a rich, deep warm brown, the primary pillow body color |
| Appliqué Color (AC) | Butter Yellow / Pale Gold — the kawaii toast/waffle face appliqué |
| Appliqué Details | Two 8mm or 10mm black safety eyes; pink embroidery thread for rosy cheek blush marks; black embroidery thread for the small curved smile |
| Stitch Pattern | Waffle stitch — alternating front post and back post double crochet in a grid pattern that creates raised and recessed squares mimicking a real waffle surface |
| Construction | Two identical waffle stitch squares crocheted and seamed together on three sides; pillow insert placed inside; fourth side seamed closed; kawaii waffle appliqué crocheted separately and stitched onto front panel |
| Pillow Insert | 14-inch standard square pillow insert (polyester fiberfill or purchased insert) |
| Photography Environment | Soft, bright white bedroom or living room setting — fluffy white faux-fur throw or white textured bedding as the surface (matching the reference image exactly), soft natural window light, the pillow shown at a slight angle on the white fluffy surface |
| Target Audience | Intermediate crocheters, kawaii and cute home decor lovers, gift makers for children and teens, food-lover crochet fans, anyone who wants a cozy and whimsical bedroom accessory |
Kawaii Waffle Pillow Crochet Pattern
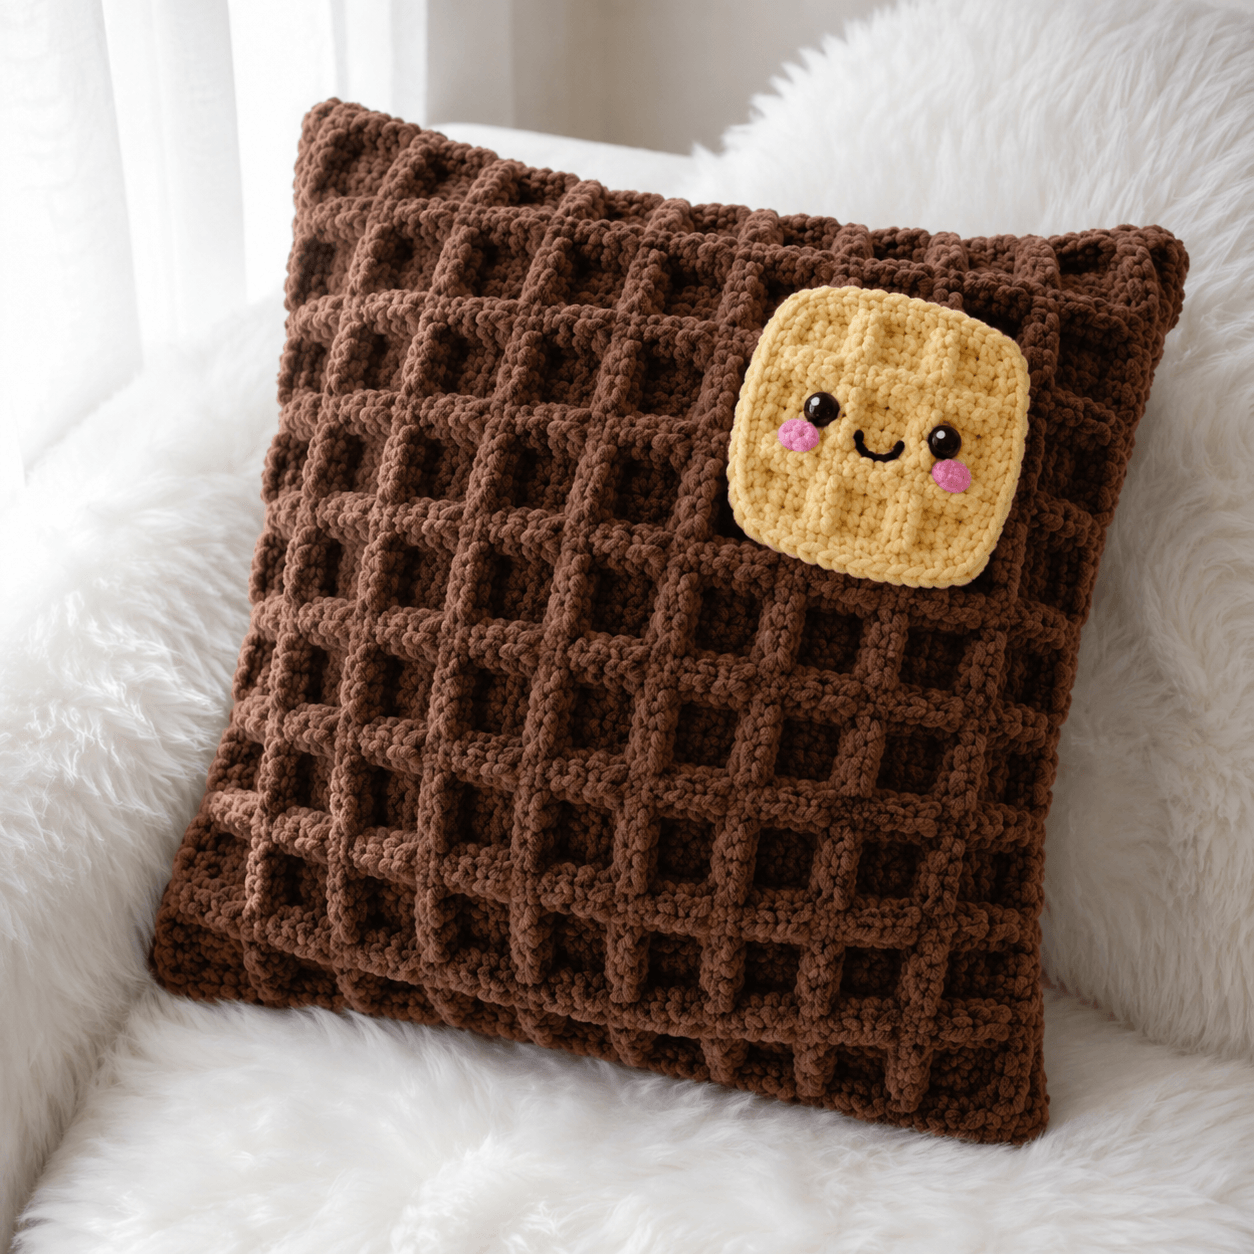
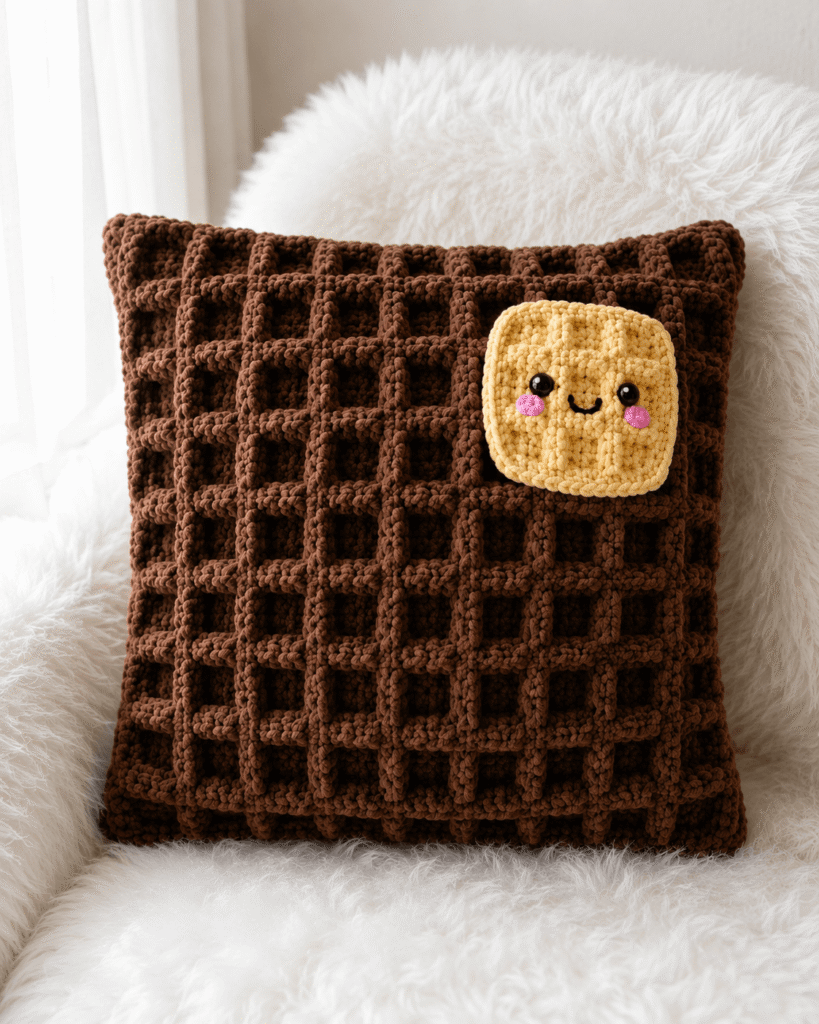
There are crochet pillows. And then there is a pillow that looks like a giant waffle with an adorable kawaii face on it. The Kawaii Waffle Pillow is firmly, joyfully in the second category.
Made in Warm Chocolate Brown bulky chenille yarn with a gorgeous waffle stitch texture that creates a real grid of raised and recessed squares across the entire pillow surface, this 14-inch square throw pillow is both a functional home accessory and a tiny work of art. The waffle stitch is the star of the construction — a pattern of alternating front and back post double crochets that mimics a real waffle grid with satisfying, tactile accuracy.
The finishing touch is what makes this pillow truly irresistible: a small Butter Yellow kawaii waffle face appliqué sits in the upper corner of the pillow, with tiny black safety eyes, embroidered pink cheek blushes, and a little smile that makes the whole pillow feel like a character rather than a cushion. It is the kind of detail that makes children squeal and adults immediately want one for themselves.
This pattern is a confident intermediate project. The waffle stitch is slightly advanced for complete beginners — it uses front and back post double crochet — but it is one of the most rewarding stitches to learn, and once mastered, produces a professional result that will impress everyone who sees it.
Frequently Asked Questions
Is the waffle stitch beginner friendly?
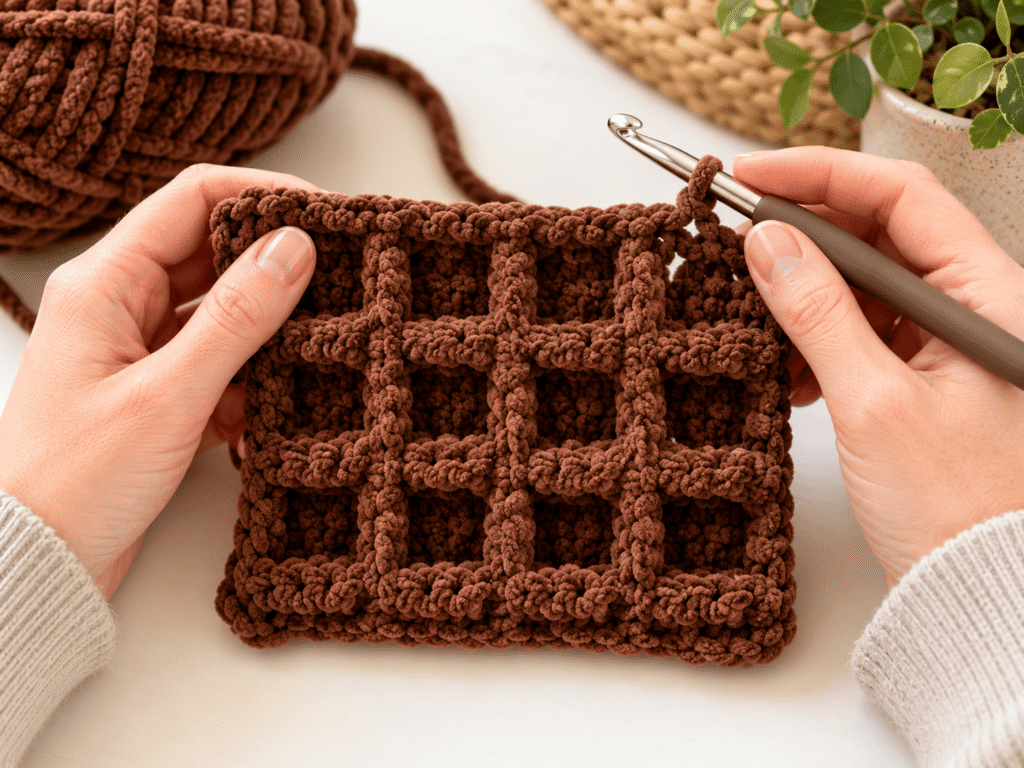
The waffle stitch uses two techniques beyond basic double crochet: front post double crochet (FPdc) and back post double crochet (BPdc). These are the same stitch inserted from different sides of the post of the previous row’s dc, creating the raised and recessed texture. Neither is difficult — they just require a slightly different hook insertion than standard stitches. Most crocheters master both within one practice row. If you have never worked post stitches before, spend 15 minutes with a practice swatch first and you will be ready to begin the full pillow confidently.
What yarn works best for this waffle pillow?
Bulky chenille velvet yarn is essential for this pillow. The plush pile of chenille creates a surface that looks and feels genuinely like a waffle — the raised post stitches catch the pile differently from the recessed stitches, creating a beautiful dimensional texture that is completely unique to chenille. The same pattern in smooth acrylic would look very different — still nice, but without the cozy, cloud-like tactile quality of chenille. Bernat Blanket yarn in a warm chocolate brown, Lion Brand Pound of Love Velvet, or Yarn Art Velvet in dark brown are all excellent choices.
How long does this pillow take to crochet?
Most intermediate crocheters complete this pillow in 8 to 12 hours total — this includes both panels, the seaming, and the kawaii appliqué. The waffle stitch panels take the majority of the time (approximately 3 to 4 hours per panel once the stitch is learned). The appliqué is quick — approximately 45 minutes to an hour. Seaming the panels together takes about 20 to 30 minutes. Plan for a full weekend project.
What size pillow insert does this pattern use?
This pattern is designed for a standard 14-inch square pillow insert. Pillow inserts in this size are widely available at craft stores, home goods stores, and online. You can also make your own insert by stitching two pieces of cotton fabric together and stuffing with polyester fiberfill. The crocheted pillow cover is worked to measure slightly smaller than the insert (approximately 13.5 inches) so the finished pillow is nicely plump and full when the insert is inserted.
Can I make this pillow in a different color?
Absolutely. The Chocolate Brown waffle texture is a perfect waffle color, but this pillow would also be stunning in Cream or Oatmeal (for a classic waffle look), Golden Yellow (for a butterscotch waffle), or even Deep Burgundy or Forest Green for a non-food themed decorative pillow. The kawaii appliqué color can be adjusted to complement whatever body color you choose — a pale golden appliqué on a cream body, or a deeper amber on a golden body. The construction is identical regardless of color.
Materials Needed
The following materials will give you the squishiest, most beautiful version of this kawaii pillow.
Yarn:
- Main Color (MC) — Warm Chocolate Brown bulky chenille: approximately 400–500 yards total for both front and back panels. Bernat Blanket Yarn in Walnut or Chocolate, Lion Brand Pound of Love Velvet in Dark Brown, or equivalent.
- Appliqué Color (AC) — Butter Yellow bulky chenille: approximately 20–25 yards for the kawaii face appliqué.
Notions and Tools:
- 5.0 mm (H/8) crochet hook
- 14-inch square pillow insert (polyester fiberfill fill preferred for plumpness)
- Two 8mm or 10mm black safety eyes for the kawaii face
- Pink embroidery thread — for the small rosy cheek blush marks (3 to 4 short horizontal stitches each side)
- Black embroidery thread — for the small curved smile
- Embroidery needle
- Scissors
- Tapestry needle — for seaming the two panels together and weaving in ends
- Stitch markers — essential for tracking post stitch placement in the waffle pattern
Why chenille for a pillow? The plush pile of bulky chenille creates a pillow that is irresistibly soft, visually sumptuous, and photographs beautifully. The waffle stitch texture is amplified by the pile — each raised square looks more dimensional and the recessed squares create deeper shadows. The result is a pillow that looks handmade in the best possible way — rich, textured, and completely unique.
Skill Level
Skill Level: Intermediate Stitches Used: Chain (ch), Slip stitch (sl st), Double Crochet (dc), Front Post Double Crochet (FPdc), Back Post Double Crochet (BPdc), Waffle stitch pattern (FPdc/BPdc grid), Single crochet seam Estimated Time: 8–12 hours total Finished Dimensions: Approximately 14 × 14 inches stuffed; pillow cover panels approximately 13.5 × 13.5 inches each before seaming
Step-by-Step Tutorial
Step 1: Learn the Waffle Stitch — Practice First
Before starting the full pillow panels, work a small practice swatch of the waffle stitch. This 15-minute investment will make the full project significantly more enjoyable.
Front Post Double Crochet (FPdc): Yarn over, insert hook from front to back around the post of the dc in the row below (not into the stitch — around the vertical post), yarn over and pull up a loop, (yarn over, pull through 2 loops) twice. The stitch creates a raised ridge on the front of the fabric.
Back Post Double Crochet (BPdc): Yarn over, insert hook from back to front around the post of the dc in the row below, yarn over and pull up a loop, (yarn over, pull through 2 loops) twice. The stitch creates a recessed impression on the front of the fabric.
Waffle stitch pattern (practice on 18 chains + 3): Foundation: Chain 21. Dc in 4th chain from hook and across. (18 dc + turning ch) Row 1: Ch 3, turn. *FPdc, FPdc, BPdc, BPdc* repeat across. End dc in top of turning ch. Row 2: Ch 3, turn. *BPdc, BPdc, FPdc, FPdc* repeat across. End dc. Row 3: Repeat Row 1. Row 4: Repeat Row 2.
The alternating FPdc/BPdc grid in a 2×2 repeat creates the waffle grid texture — squares of raised stitches alternating with squares of recessed stitches in a clean checkerboard of texture.
Step 2: Crochet the Front Panel in Chocolate Brown
Using Warm Chocolate Brown chenille and your 5.0 mm hook, chain 58 (or to your gauge — the panel should measure approximately 13.5 inches across before seaming).
Foundation Row: Dc in 4th chain from hook and in each chain across. (55 dc + turning ch). Chain 3, turn.
Waffle Stitch Body: Work the 2-row waffle stitch repeat throughout:
- Odd rows: Ch 3, *FPdc 2, BPdc 2* repeat across, end dc in turning ch.
- Even rows: Ch 3, *BPdc 2, FPdc 2* repeat across, end dc in turning ch.
Continue the waffle stitch pattern until the panel measures approximately 13.5 inches tall — typically 30 to 35 rows depending on your individual tension with chenille yarn. Fasten off, leaving a long tail for seaming.
As you work the waffle stitch rows in Chocolate Brown chenille, the raised and recessed squares will become beautifully visible — the pile of the chenille catching the light differently on each square type, creating a rich, deeply textured surface.
Step 3: Crochet the Back Panel
Work an identical second panel in Warm Chocolate Brown chenille using the same foundation chain, waffle stitch body, and row count as the front panel. The back panel does not need the same level of waffle texture precision as the front — you could work the back in simple double crochet rows for speed — but working both panels identically gives a more professional, reversible finished pillow.
Fasten off the back panel, leaving a long tail.
Hold both panels together and check that they are the same size. If one panel is slightly larger, work one or two additional rows on the smaller panel, or block both panels lightly to even out any minor size differences before seaming.
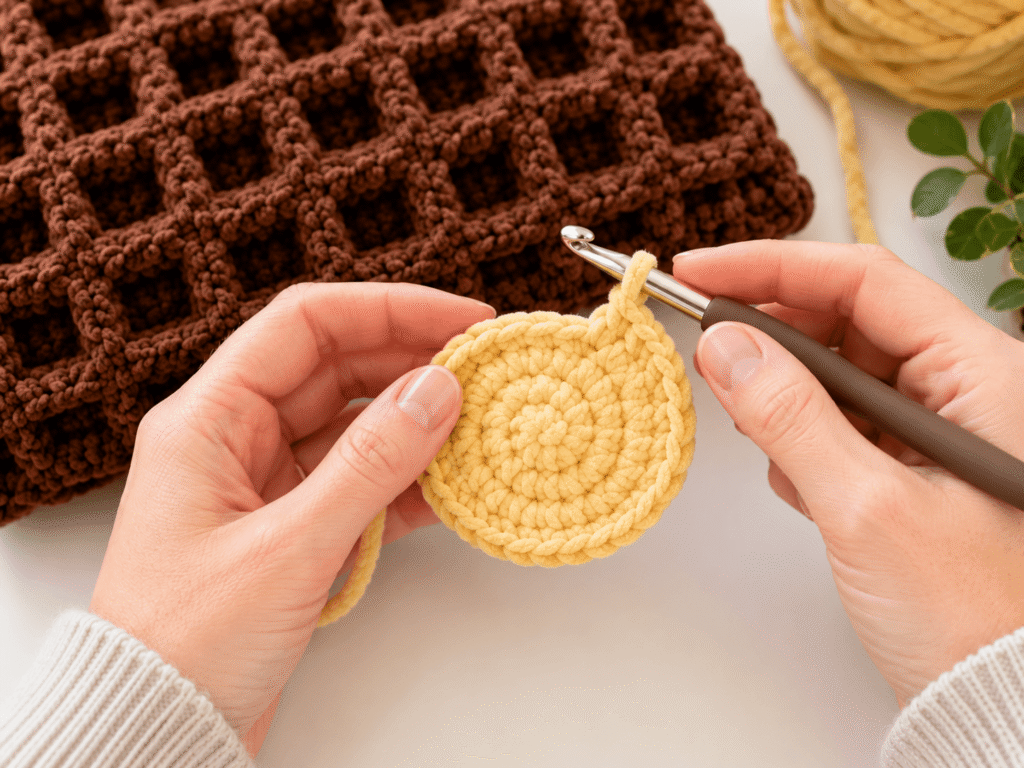
Step 4: Crochet the Kawaii Waffle Appliqué
The kawaii appliqué is what transforms this from a beautiful textured pillow into an unforgettable one.
Using Butter Yellow chenille and your 5.0 mm hook, make a magic ring.
Round 1: 8 sc into the ring. Do not join — work in a continuous spiral. (8 sc) Round 2: Inc in each stitch. (16 sc) Round 3: *Sc 1, inc* repeat. (24 sc) Round 4: *Sc 2, inc* repeat. (32 sc) Rounds 5–8: Work even — sc in each stitch for 4 rounds. (32 sc)
At Round 6, insert your black safety eyes approximately 8 to 9 stitches apart in the upper half of the piece. Lock the backings firmly.
Round 9: *Sc 2, dec* repeat. (24 sc)
Stuff the appliqué lightly with a small amount of polyester fiberfill — just enough to give it a slight dimensional puff.
Round 10: *Sc 1, dec* repeat. (16 sc) Round 11: Dec around. (8 sc)
Slip stitch to close. Leave a long Butter Yellow tail for attaching to the pillow.
Embroidery: Using pink embroidery thread and your embroidery needle, stitch 3 to 4 small horizontal lines on each side of the face below and beside the eyes — these are the rosy cheek blushes. Using black embroidery thread, stitch a small gentle upward curve for the smile, centered below the eyes.
Step 5: Seam the Pillow and Attach the Appliqué
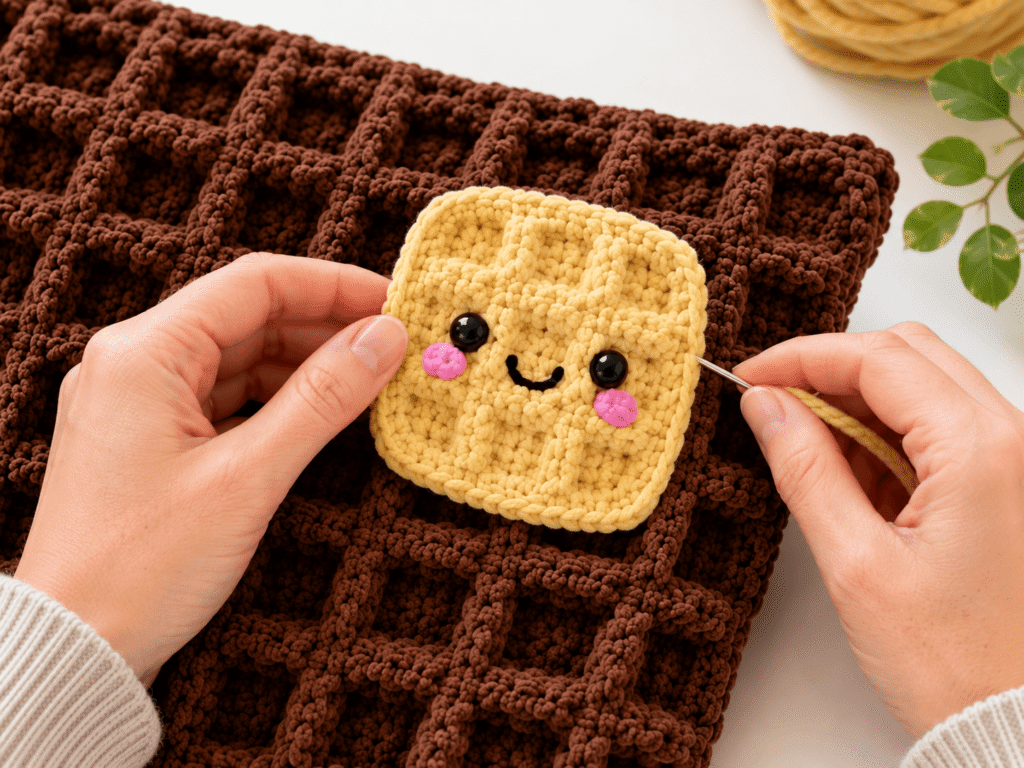
Attach the appliqué first: Before seaming the two panels together, attach the kawaii appliqué to the front panel. Position it in the upper right area of the front panel, approximately 2 inches from the top edge and 2 inches from the right edge — matching the reference image. Using the long Butter Yellow tail and your tapestry needle, whipstitch the appliqué firmly all the way around its perimeter. Go around twice for security. The appliqué should sit flat against the front panel surface. Knot and weave in the tail.
Seam the panels: Hold the front and back panels with wrong sides together (right sides facing outward). Using Chocolate Brown yarn and your tapestry needle, whipstitch along three sides — the top edge, the right side edge, and the bottom edge — going through both layers, catching the outermost stitch of each panel. Pull the seam stitches firm but not tight.
Insert the 14-inch pillow insert through the open left side edge. Adjust the insert so the pillow is evenly filled and plump. Whipstitch the remaining left side edge closed. Knot firmly and weave in all tails.
Step 6: Final Finishing and Styling
Do a final inspection of all seams — give each corner a gentle tug to confirm they are secure. Check that the kawaii appliqué is firmly attached and the safety eyes are locked. Check that the embroidered smile and cheek blushes are neat and centered.
Fluff the pillow by pressing it gently with both hands and shaping the corners into clean right angles. The chenille will naturally soften any corner stiffness.
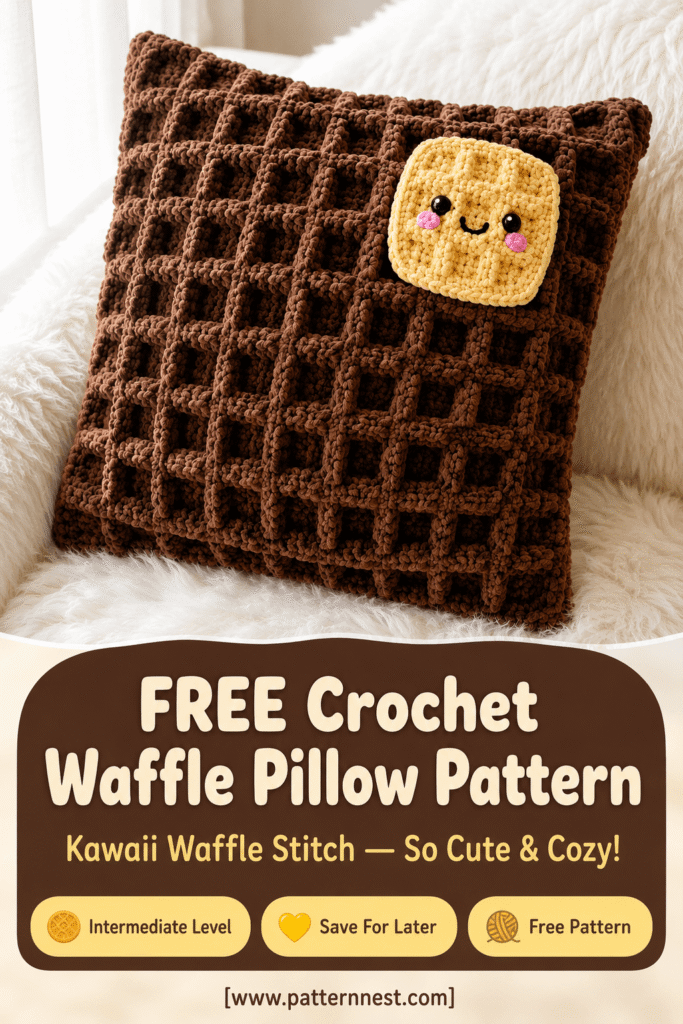
Place the finished Kawaii Waffle Pillow on a fluffy white throw, a white bedspread, or a light-colored couch surface. Position it at a slight angle so both the waffle stitch texture and the kawaii face are visible — just as in the reference image. The rich Chocolate Brown chenille and the Butter Yellow appliqué face together make an immediately charming and completely irresistible display.
Helpful Tips
- Work a tension swatch before the full panel. Chenille yarn and post stitches together can produce significant tension variation between crocheters. A 4-inch waffle stitch swatch lets you check your stitch count and row count against the target dimensions before committing to a full panel. Adjust your hook size up or down one size if your swatch is significantly off from the target measurements.
- Use stitch markers every 8 stitches. The waffle stitch requires tracking exactly which stitches are FPdc and which are BPdc across every row. Placing a stitch marker every 8 stitches (every 2 repeats) creates checkpoints that make it easy to verify your pattern alignment mid-row without counting back to the beginning.
- Count post stitches — not chain tops. In post stitch crochet, it is easy to accidentally work into the top of a stitch rather than around its post, especially in fluffy chenille where the pile obscures the stitch structure. Always confirm your hook is going around the vertical post of the stitch below, not into the top loop.
- Stuff the appliqué firmly enough to hold its shape. An under-stuffed kawaii appliqué will flatten against the pillow surface and lose its charming 3D quality. Stuff it until it feels plump to the squeeze — the chenille exterior will accommodate more stuffing than you expect.
- Attach the appliqué before seaming the pillow. It is much easier to stitch the kawaii face appliqué onto a flat panel than onto a fully seamed, stuffed pillow. Always complete the appliqué attachment on the flat front panel before assembling the pillow.
Common Mistakes to Avoid
- Working into the stitch top instead of around the post. This is the most common mistake in post stitch crochet and completely destroys the waffle texture. If your fabric looks like regular double crochet rather than a textured grid, you are likely working into the stitch tops. Check your hook insertion point on every post stitch.
- Reversing the FPdc/BPdc pattern between rows. The waffle stitch requires rows 1 and 3 to be identical, and rows 2 and 4 to be identical — a true 2-row repeat where the stitches alternate. If you accidentally work Row 2 as a repeat of Row 1, the texture alignment will break and you will get a rib pattern instead of a waffle grid. Mark Row 1 start stitches to keep your orientation.
- Making two panels of different sizes. If one panel is noticeably larger than the other, the seamed pillow will be uneven and the corners will not align. Check both panels against the same dimension reference (a ruler or cardboard template) before seaming.
- Placing the kawaii eyes before the piece is fully formed. Safety eyes should be installed only after the appliqué piece is large enough to show the correct final proportions — installing them too early may result in incorrect eye placement that cannot be adjusted once the backing is locked. Install eyes at Round 6, after the shape is clearly established.
- Seaming too tightly. A whipstitch seam that is pulled too tight will cause the pillow edges to pucker and the corners to distort. Work the seaming stitches with a firm but relaxed tension — the seam should be secure without drawing the fabric inward.
Final Thoughts
The Kawaii Waffle Pillow is one of those rare crochet projects that makes everyone in the room smile the moment they see it. The waffle stitch texture is genuinely impressive — a tactile, dimensional surface that showcases real crochet skill. And that little Butter Yellow face peeking from the corner turns a beautiful pillow into an object of pure delight.
Make one for your own couch. Make one for a child’s bedroom. Make one for the most food-obsessed friend you have. However you make it, the Kawaii Waffle Pillow will be the most talked-about thing on any soft surface it sits on.
Save This Pattern For Later
Can’t stop smiling at this little waffle face? Pin this pattern to your Crochet Home Decor or Kawaii Crochet Projects board on Pinterest right now so you always have it. Share it with every crocheter who loves cute, cozy, and completely original handmade home accessories — this one was made to be made and given and loved.