CROCHET FLOWER COASTER
| Field | Details |
|---|---|
| Project Name | Blooming Flower Crochet Coaster |
| Project Type | Round Crochet Coaster / Cup Mat |
| Skill Level | Beginner–Intermediate |
| Estimated Completion Time | 1–2 hours per coaster |
| Finished Size | Approximately 5–6 inches in diameter including the outer flower border |
| Recommended Yarn Type | Soft worsted weight cotton or acrylic-cotton blend — smooth for center stitch definition, holds structure for 3D bobble flowers |
| Recommended Yarn Weight | Worsted weight (Category 4) |
| Recommended Hook Size | 4.0 mm (G/6) crochet hook |
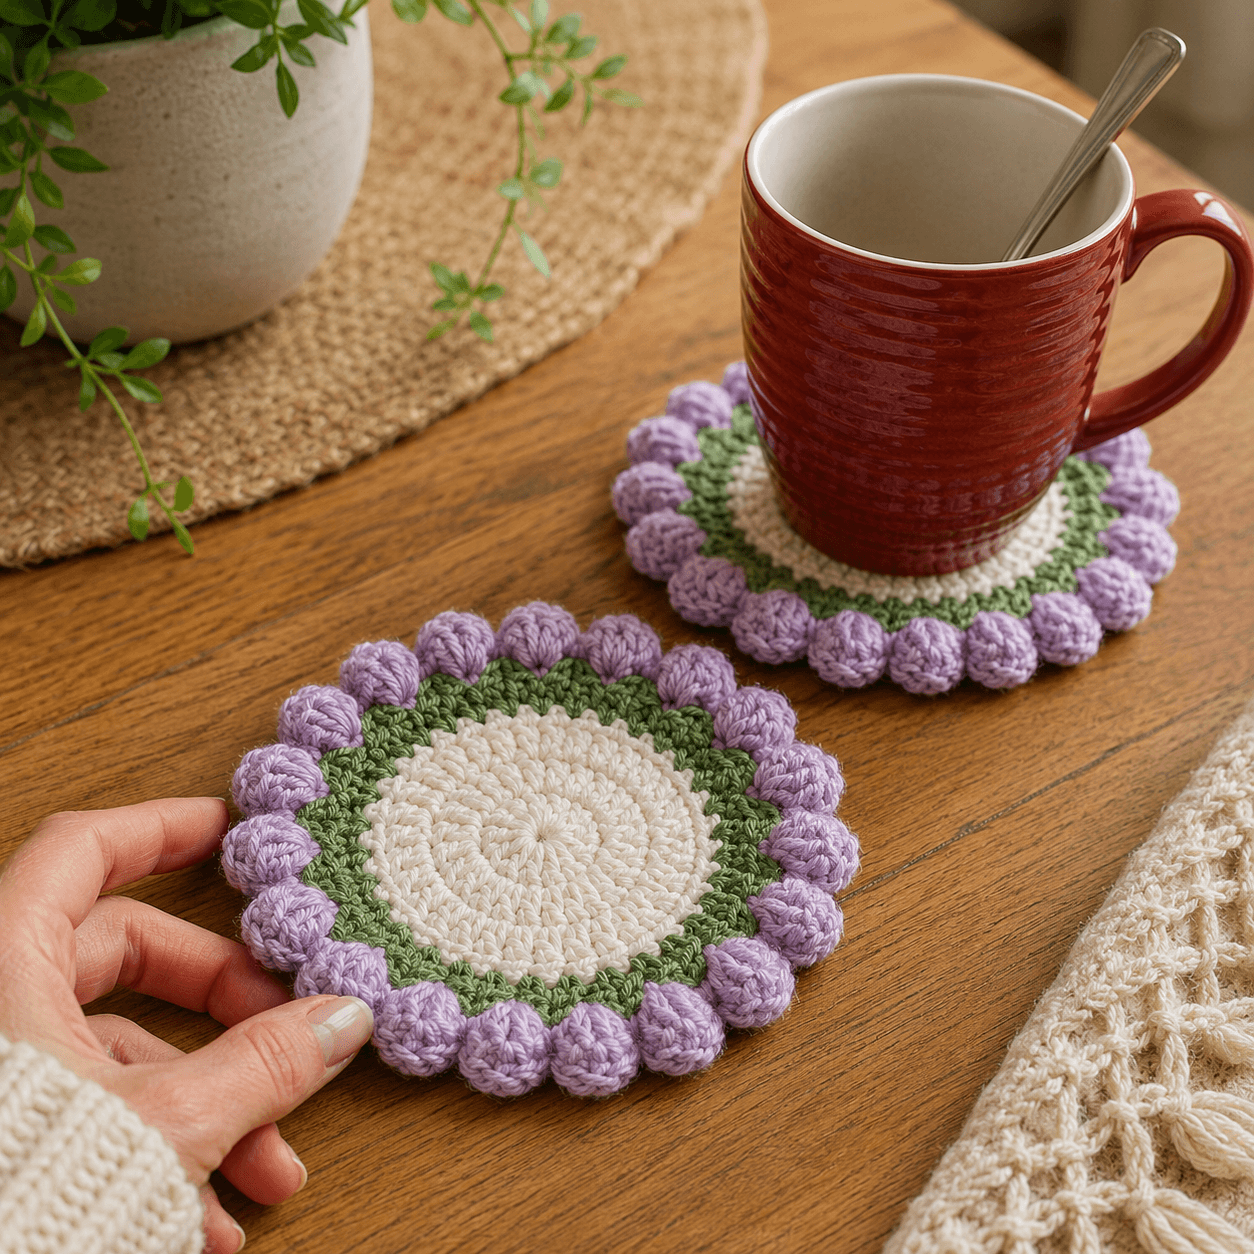
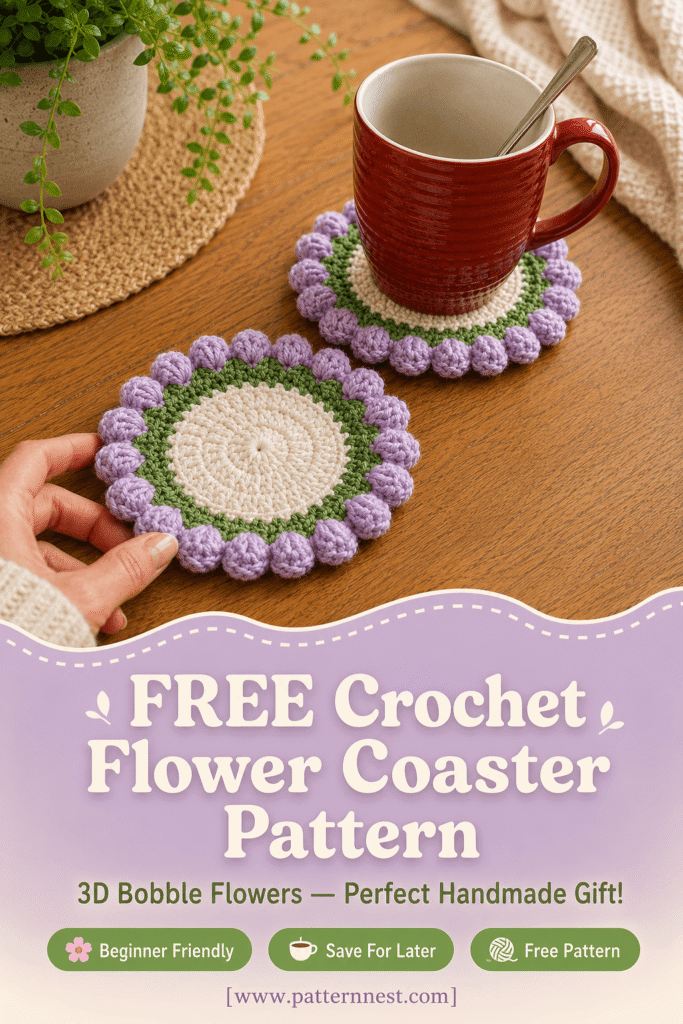
| Color 1 (C1) | Cream White — the entire center disc worked in dense puff / half double crochet rounds |
| Color 2 (C2) | Fern Green / Olive Green — the scalloped transitional border round between the white center and the outer flowers |
| Color 3 (C3) | Soft Lavender / Lilac — the dimensional 3D bobble flower clusters of the outer border ring |
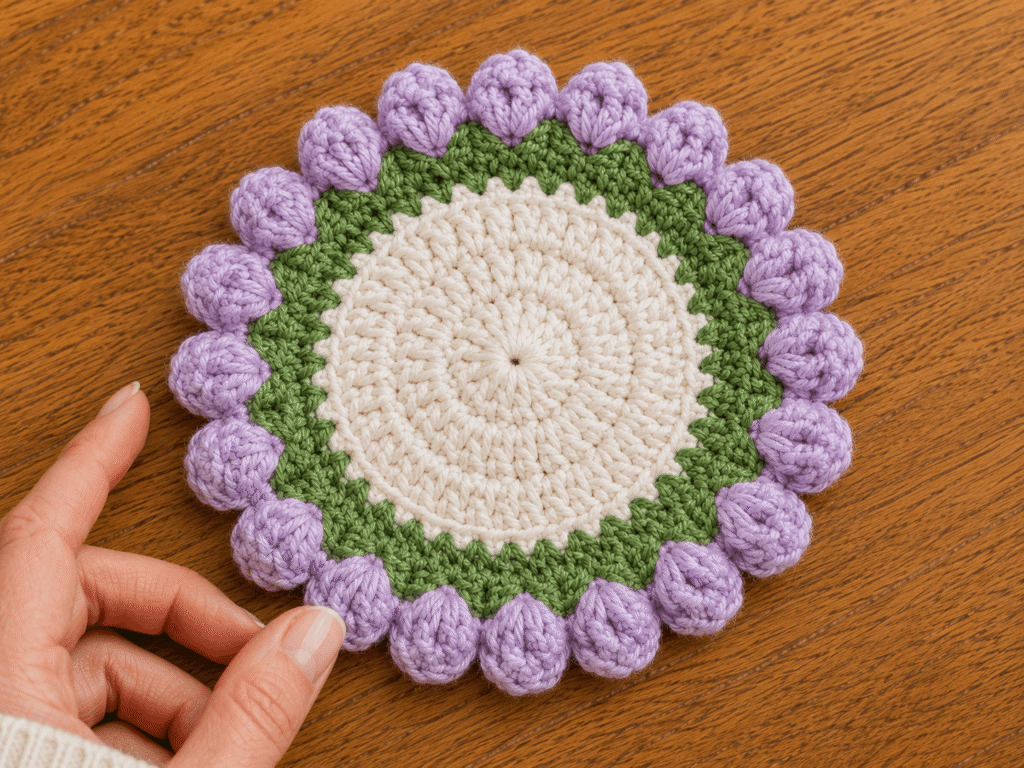
| Construction | Worked entirely in the round from center outward: solid white center disc → green scalloped border → outer ring of dimensional lavender bobble flowers |
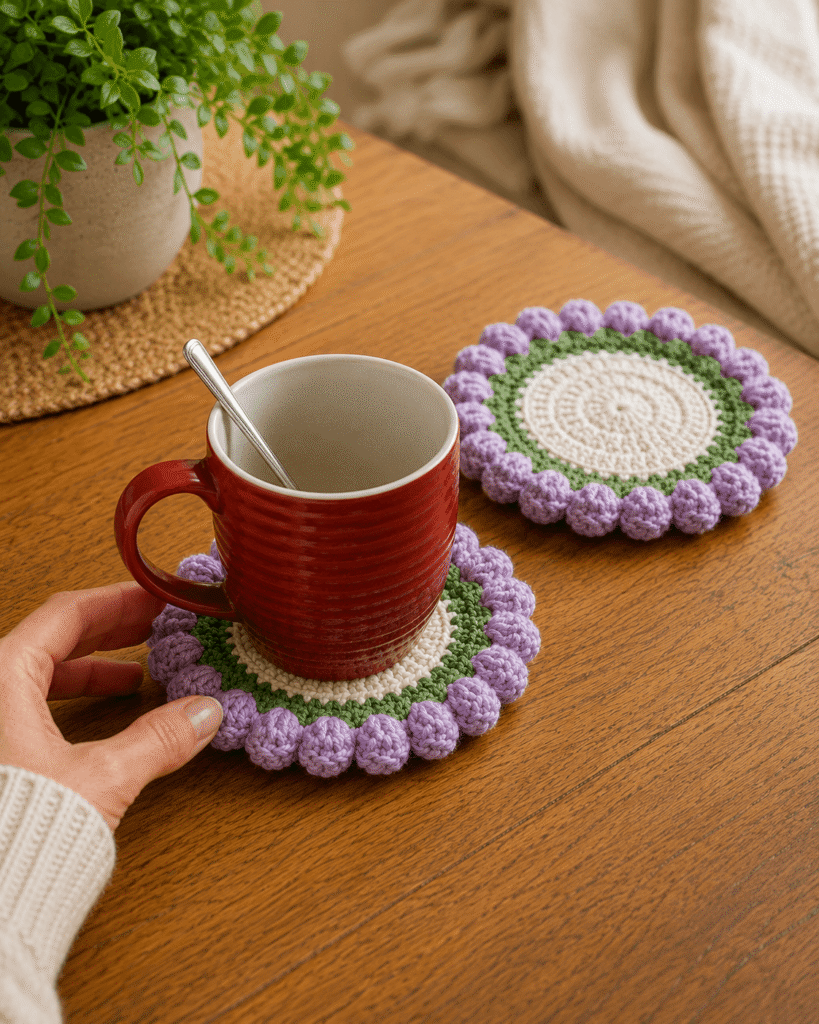
| Photography Environment | Warm, bright modern home desk or kitchen table setting — warm honey-toned wood surface, a red ceramic mug with a spoon resting on a finished coaster (as in the reference image), a second coaster laid flat beside it for display, soft natural window light from the left, clean and lifestyle-styled |
| Target Audience | Beginner–intermediate crocheters, home decor crafters, gift makers, women who love quick satisfying projects, people who want to make a full set of coasters as handmade gifts, spring and cottage home aesthetic lovers |
Crochet a Flower Coaster in an Afternoon — Free Beginner Pattern
What if the prettiest thing on your coffee table was something you made yourself in under two hours? The Blooming Flower Crochet Coaster is exactly that — a quick, satisfying, and genuinely beautiful crochet project that works up in a single afternoon and looks like it took days.
This coaster features a dense, padded Cream White center disc that protects your table surface beautifully, a Fern Green scalloped border that frames it like a ring of leaves, and a glorious outer ring of dimensional 3D bobble flower clusters in Soft Lavender that makes every cup of coffee feel like a special occasion. Made in a set of four or six, these coasters become a stunning handmade home gift that anyone would be thrilled to receive.
The technique is beginner to intermediate — the center disc and green border are completely beginner-friendly, and the outer lavender bobble flowers require just one new skill: the bobble or puff stitch. Once you make your first bobble flower, the rest of the ring works up fast and feels deeply satisfying.
Spring, summer, a housewarming gift, a Mother’s Day set, a Sunday afternoon project — there is never a wrong time to make a Blooming Flower Coaster.
Frequently Asked Questions
Is this coaster pattern beginner friendly?
This pattern is rated beginner to intermediate. The Cream White center and Fern Green scalloped border are completely achievable for any beginner who can crochet in the round. The outer Lavender bobble flower clusters require learning one new technique — the bobble or puff stitch — which creates the dimensional, raised flower shapes. The bobble stitch takes about 5 minutes to learn and one practice flower to master. After that, the outer ring of flowers is repetitive and deeply enjoyable to work.
What yarn works best for these coasters?
A smooth, structured worsted weight cotton or cotton-acrylic blend is ideal. Cotton gives the coaster excellent absorbency (important for a cup mat that will catch condensation), good stitch definition so the white center texture and green scallops are crisp, and durability for repeated machine washing. Lion Brand 24/7 Cotton, Paintbox Simply DK Cotton, or Drops Safran in the three colors are all excellent choices. Avoid fuzzy or novelty yarns — they will soften the stitch definition and reduce absorbency.
How long does one coaster take to make?
Most beginners complete their first coaster in 1.5 to 2 hours, including the time it takes to learn the bobble flower stitch on the outer border. By the second coaster in a set, most makers are finishing in 60 to 75 minutes. By the fourth coaster, the rhythm is so comfortable that the work flows almost automatically. Making a set of four coasters as a gift takes approximately 6 to 8 hours total — a very achievable one-weekend project.
What size will the finished coaster be?
The finished coaster measures approximately 5 to 6 inches in diameter including the outer bobble flower border. The white center disc is approximately 3 to 3.5 inches across. The green scalloped border adds approximately half an inch, and the outer ring of lavender bobble flowers adds another inch all around. This is a generous coaster size — large enough for a standard mug, a large water glass, or a small teapot.
Can I make these in different colors?
Absolutely — the three-element construction (center disc, scalloped border, outer bobble flowers) works in any color combination. Some beautiful alternatives: a dusty rose center with ivory scallops and soft peach flowers for spring; a sage green center with cream scallops and soft yellow flowers for summer; a deep burgundy center with forest green scallops and terracotta flowers for autumn; or a navy center with silver-grey scallops and white flowers for a winter set. The color proportions and pattern structure remain identical regardless of color.
Materials Needed
The following materials will give you the most beautiful, structured, and long-lasting version of this coaster.
Yarn — all worsted weight cotton or cotton-acrylic blend:
- Color 1 (C1) — Cream White: approximately 25–30 yards per coaster (center disc)
- Color 2 (C2) — Fern Green / Olive Green: approximately 10–12 yards per coaster (scalloped border round)
- Color 3 (C3) — Soft Lavender / Lilac: approximately 20–25 yards per coaster (outer bobble flower ring)
For a set of 4 coasters: approximately 100–120 yards Cream White, 40–48 yards Fern Green, 80–100 yards Soft Lavender.
Tools and Notions:
- 4.0 mm (G/6) crochet hook
- Scissors
- Tapestry needle — for weaving in all color-change ends
- Stitch markers — to mark the beginning of each round
- Measuring tape — to check finished diameter
Why cotton? For a coaster that will actually be used on a table with hot and cold drinks, absorbency and washability are non-negotiable. Cotton wicks moisture, stands up to repeated machine washing, and does not melt or distort under a hot mug. It also keeps its color well over many washes. Make your coasters in cotton and they will last for years.
Skill Level
Skill Level: Beginner–Intermediate Stitches Used: Magic ring, Single crochet (sc), Half double crochet (hdc), Double crochet (dc), Increase (inc), Bobble stitch / Puff stitch (explained in detail), Scallop stitch, Color change Estimated Time: 1–2 hours per coaster Finished Dimensions: Approximately 5–6 inches diameter
Step-by-Step Tutorial
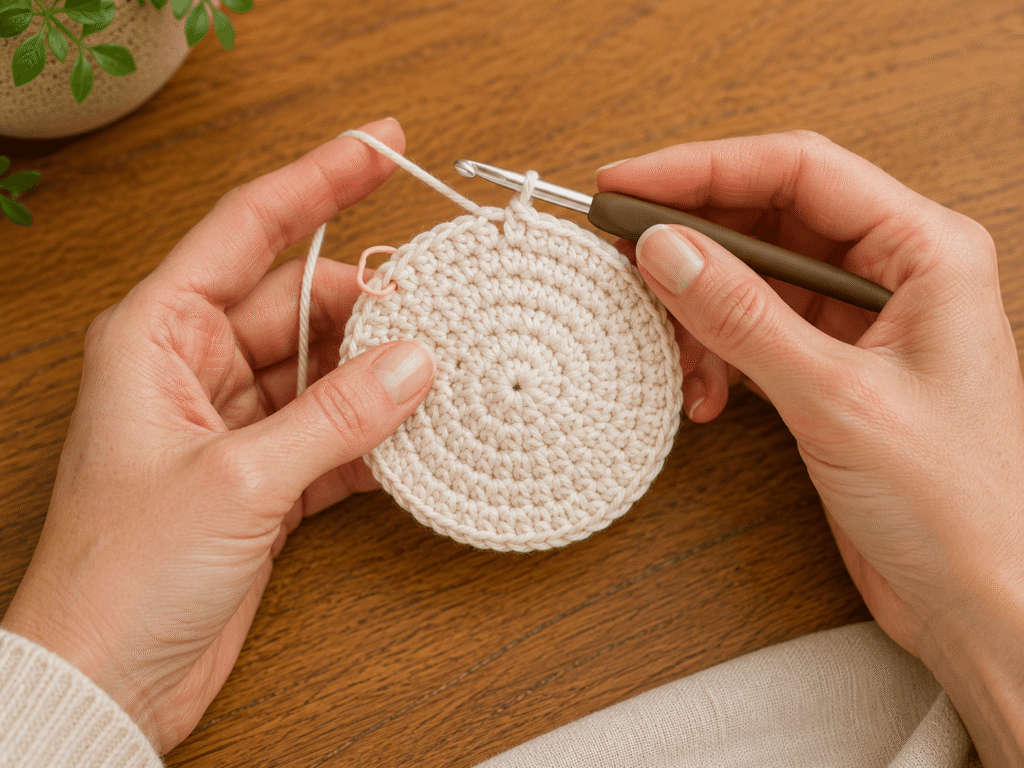
Step 1: Crochet the Cream White Center Disc
The white center disc is the functional heart of the coaster — dense, padded, and beautifully textured with tight hdc rounds that create a fabric thick enough to protect your table surface from heat and condensation.
Using Cream White yarn (C1) and your 4.0 mm hook, make a magic ring.
Round 1: Work 8 hdc into the magic ring. Pull closed. Join with sl st. (8 hdc) Round 2: Ch 2 (counts as first hdc). Hdc inc in each stitch around. Join. (16 hdc) Round 3: Ch 2. *Hdc, hdc inc* repeat around. Join. (24 hdc) Round 4: Ch 2. *Hdc 2, hdc inc* repeat around. Join. (32 hdc) Round 5: Ch 2. *Hdc 3, hdc inc* repeat around. Join. (40 hdc) Round 6: Ch 2. *Hdc 4, hdc inc* repeat around. Join. (48 hdc)
Your white center disc should measure approximately 3 to 3.5 inches in diameter at this point. The dense half double crochet rounds create a naturally padded surface with a beautiful circular radiating texture. Do not fasten off — continue directly to the green border or fasten off and rejoin if you prefer.
Step 2: Work the Fern Green Scalloped Border
The Fern Green border is the elegant transitional element that frames the white center and creates the visual separation between the center disc and the outer flower ring. Its scalloped structure mimics the look of leaves surrounding a flower.
Attach Fern Green yarn (C2) at any stitch of the final white round, joining with a standing sc.
Scalloped border round: *Sc in next stitch, skip 1 stitch, work (dc, ch 1, dc, ch 1, dc) into the next stitch — this is one scallop, skip 1 stitch* repeat all the way around. Join with sl st. (12 scallop points evenly spaced around the circle)
The Fern Green scallop creates a ring of small pointed arches that frame the white disc beautifully — each scallop mimicking the shape of a leaf or petal base. The color transition from Cream White to Fern Green to the coming Lavender is visually perfect.
Fasten off Fern Green. Weave in the tail.
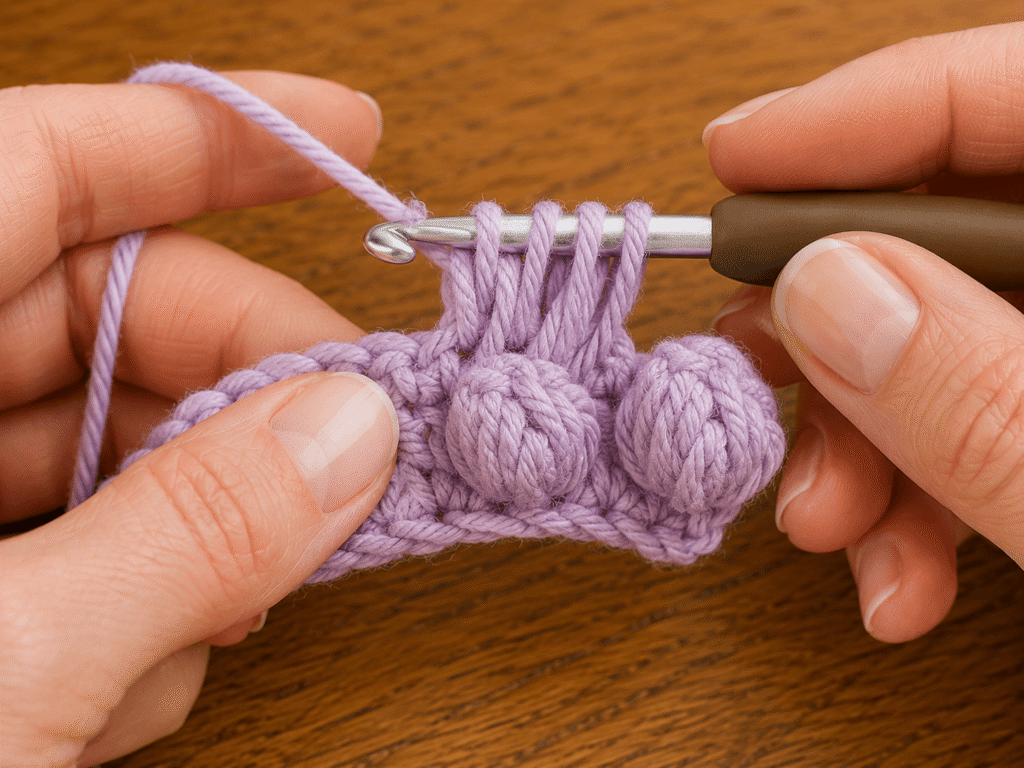
Step 3: Learn the Lavender Bobble Flower Stitch
Before beginning the outer flower ring, take a moment to practice the bobble/puff stitch that creates each dimensional flower cluster. This is the signature technique of the outer border and the most visually striking element of the finished coaster.
How to work one bobble flower cluster:
- Insert hook into stitch, yarn over, pull up a loop — do not close. (2 loops on hook)
- Insert into same stitch, yarn over, pull up a loop — do not close. (3 loops on hook)
- Insert into same stitch, yarn over, pull up a loop — do not close. (4 loops on hook)
- Yarn over and pull through all 4 loops simultaneously. Chain 1 to close and lock the bobble.
This creates one puffy, dimensional bobble cluster. Each “flower” in the outer ring is made of 3 bobble clusters grouped together into the same space, creating a small 3-petal flower shape.
Practice on a separate chain until the stitch feels comfortable before beginning the outer flower ring.
Step 4: Work the Outer Lavender Bobble Flower Ring
Attach Soft Lavender yarn (C3) into any ch-1 space of the Fern Green scalloped border.
Flower ring round: Work into each ch-1 space of the green scallop border around the full circle. For each flower position:
*(Bobble, ch 1, bobble, ch 1, bobble) all into the same ch-1 space — this is one complete 3-petal bobble flower. Ch 2. Sc into the next ch-1 space of the scallop border to anchor between flowers. Ch 2.* Repeat around.
This creates a full ring of dimensional 3-petal lavender bobble flowers evenly spaced around the entire outer border of the coaster. Each flower sits between two Fern Green scallop points, creating the effect of a ring of lavender blooms surrounding a green-leafed white center.
Join with a slip stitch at the base of the first flower. Fasten off Lavender.
Check that all flowers are uniform and evenly spaced. The dimensional bobble clusters should stand up slightly from the surface, giving the outer border its characteristic 3D floral texture.
Step 5: Final Finishing and Adjustments
Weave in all remaining yarn ends using your tapestry needle — the Cream White magic ring tail, the Fern Green tail, and the Lavender tail. Work each end through at least 4 to 5 stitches in two directions to secure against the pull of use and washing.
Check the coaster lies flat: If your coaster is doming upward in the center, your tension in the white rounds is too tight — the increasing rounds need to be worked with a relaxed tension to keep the disc flat. If the edges are rippling, you have too many increases — reduce by one stitch per increase round on your next coaster.
Light blocking: Mist the finished coaster with water from a spray bottle and press flat with your palm on a clean surface. Allow to dry flat. This settles the white center disc into a perfectly flat, even circle and gently opens up the green scallops and lavender flowers.
Step 6: Make a Full Set and Style for Display or Gifting
The Blooming Flower Coaster is most beautiful in multiples. A set of four to six coasters is the ideal project — each one takes less time than the one before as your hands learn the rhythm, and a finished set stacked together or fanned out in a display makes one of the most impressive handmade gifts imaginable.
For gifting: Stack the finished coasters in a neat pile, tie with a length of Lavender or Fern Green yarn in a simple bow, and tuck a handwritten tag between the top two coasters.
For display: Fan the coasters slightly overlapping on a decorative tray, or place one under a coffee mug on the kitchen counter for an everyday touch of handmade beauty.
Machine washing: Wash on a gentle cold cycle. Lay flat to dry. The cotton will maintain its structure and color through many washes. If the flowers lose a little of their 3D puff after washing, a gentle steam with an iron held slightly above the surface restores their shape.
Helpful Tips
- Use a magic ring — never a chain ring. The magic ring closes completely with no center hole, which is important for a coaster that needs a smooth, solid center. A chain ring leaves a visible hole at the center of the white disc that cannot be hidden and weakens the center of the coaster.
- Count your stitches at the end of every round. The white center disc depends on consistent increase rounds for a perfectly flat, circular result. A missed increase or an extra one will cause the disc to dome or ripple. Count every round before continuing.
- Work the bobble flowers with firm, even tension. A bobble that is too loose will be flat rather than dimensional. Pull each loop up to a consistent height and yarn over the final closing firmly — the bobble should feel slightly resistant as you close all loops together. This resistance is what creates the 3D puff.
- Make all coasters in a set from the same yarn dye lot. Cotton yarn can vary slightly between dye lots, which would create visible color differences between coasters in a set. Purchase enough yarn for the entire set at once and confirm the dye lot number on each skein before buying.
- Work the green scalloped border loosely. The Fern Green scallop round needs to sit flat and even around the white circle. If your scallops are pulling the coaster edge inward, your tension is too tight — consciously relax your grip for this border round. The scallops should lie flat against the white disc edge, not curl upward or inward.
Common Mistakes to Avoid
- A domed center disc. If your white center is puffing upward rather than lying flat, your tension in the increasing rounds is too tight. Blocking will help, but the real fix is consciously working the hdc rounds with a slightly looser grip — especially in Rounds 3 through 6.
- Uneven bobble flowers. Bobble flowers that vary in size and puffiness make the outer ring look inconsistent. The key is pulling each loop to exactly the same height before the final closing yarn-over. Practice until your bobbles are consistent before beginning the full outer ring.
- Green scallops that are too far apart or too close together. The scallop placement in the green border round determines the spacing of the lavender flowers in the outer ring. If the scallops are unevenly spaced, the flowers will be too. Work the scallops carefully, counting the skip stitches precisely.
- Skipping the magic ring tail weave-in. The magic ring tail must be woven in very securely — it is the only thing holding the center of the coaster closed. Weave this tail through at least 5 to 6 stitches in two directions and finish with a small knot if needed for extra security.
- Not making a matching set. A single coaster is lovely. A set of four or six is a genuinely impressive handmade gift that people treasure. Once you make the first one, the pattern rhythm is in your hands — keep going.
Final Thoughts
The Blooming Flower Coaster is one of those projects that combines everything that makes crochet so satisfying: a fast result, a beautiful stitch, a practical purpose, and the quiet joy of making something pretty with your own hands. A single coaster takes an afternoon. A set of six takes a weekend. And the person you give them to will have them on their coffee table for years.
Make them in lavender and white for spring. Make them in mustard and rust for autumn. Make them in red and gold for the holidays. However you make them, they are worth every stitch.
Save This Pattern For Later
Fell in love with these flower coasters? Pin this pattern to your Crochet Home Decor or Quick Crochet Projects board on Pinterest right now so you can find it every time you need a beautiful, fast, gift-ready project. Share it with every crocheter you know who loves making things for their home — these coasters are the project that turns a casual crocheter into an obsessed one.